Rubrics
Release Date: September 29, 2025
Rubrics bring consistency to grading, speed up marking, and make expectations clear. Build once and reuse across courses and templates, then grade where you already work—in the Gradebook or Individual Student view. Flexible scoring (points/percentage or feedback-only), optional ranges, and criterion weights let you match your program’s standards while keeping feedback transparent for students.
Home / Rubrics
Create and manage your rubric library. Add a name and description, choose a level scale, select how it scores (points or percentage, or feedback-only), set the number of criteria, and optionally enable Levels with Range and Criteria Weights. Search, tag, duplicate, or archive rubrics as your library grows.
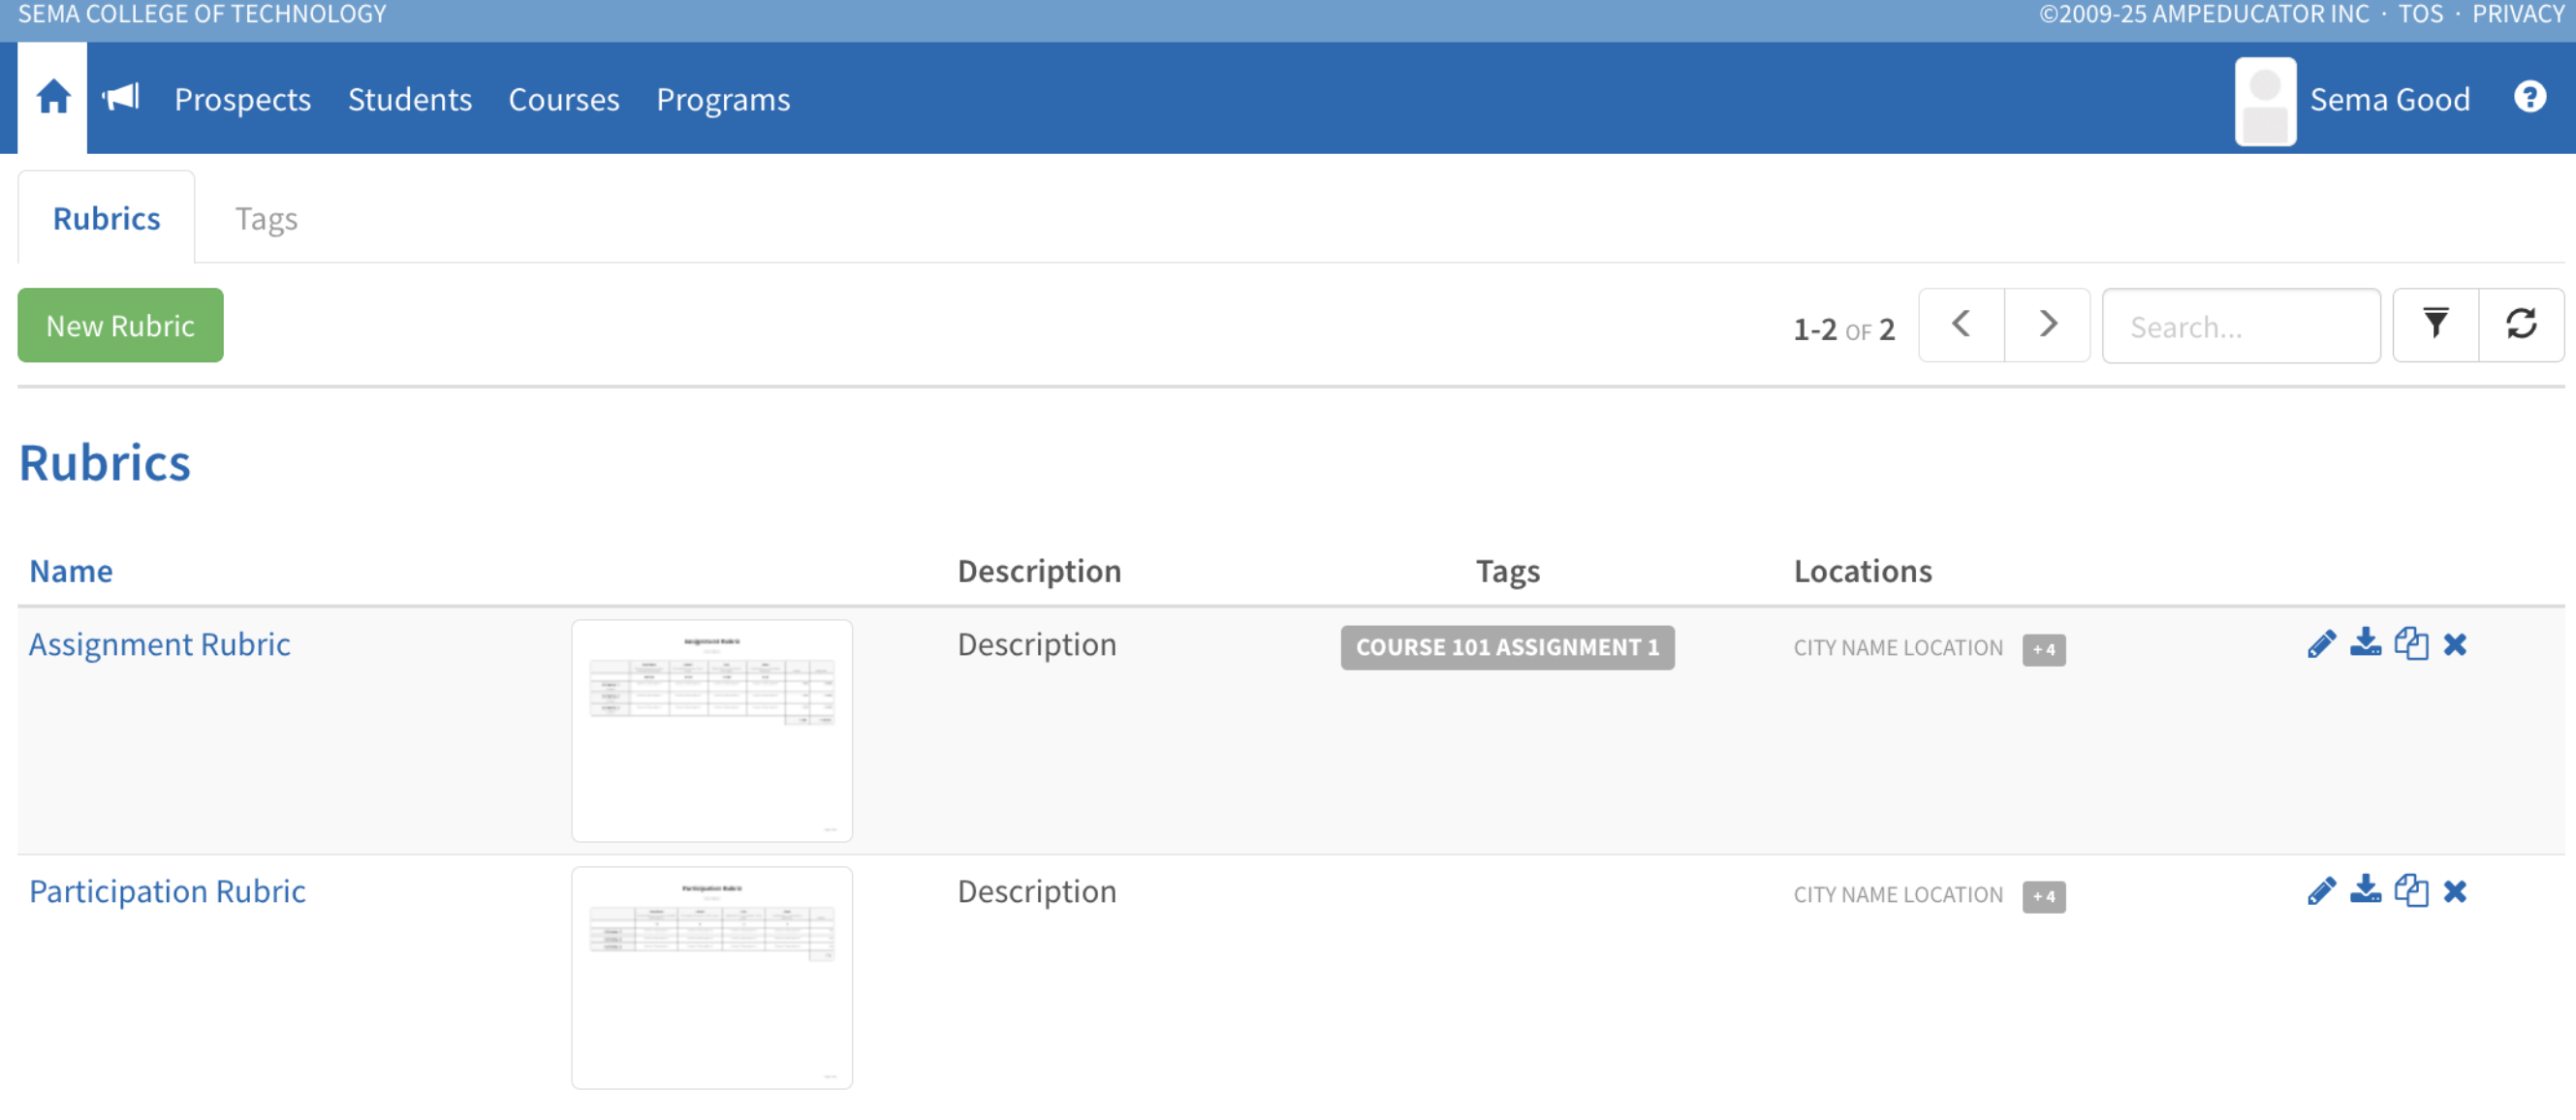
Use the Tags tab to create and manage tags so you can group and filter rubrics across the bank.
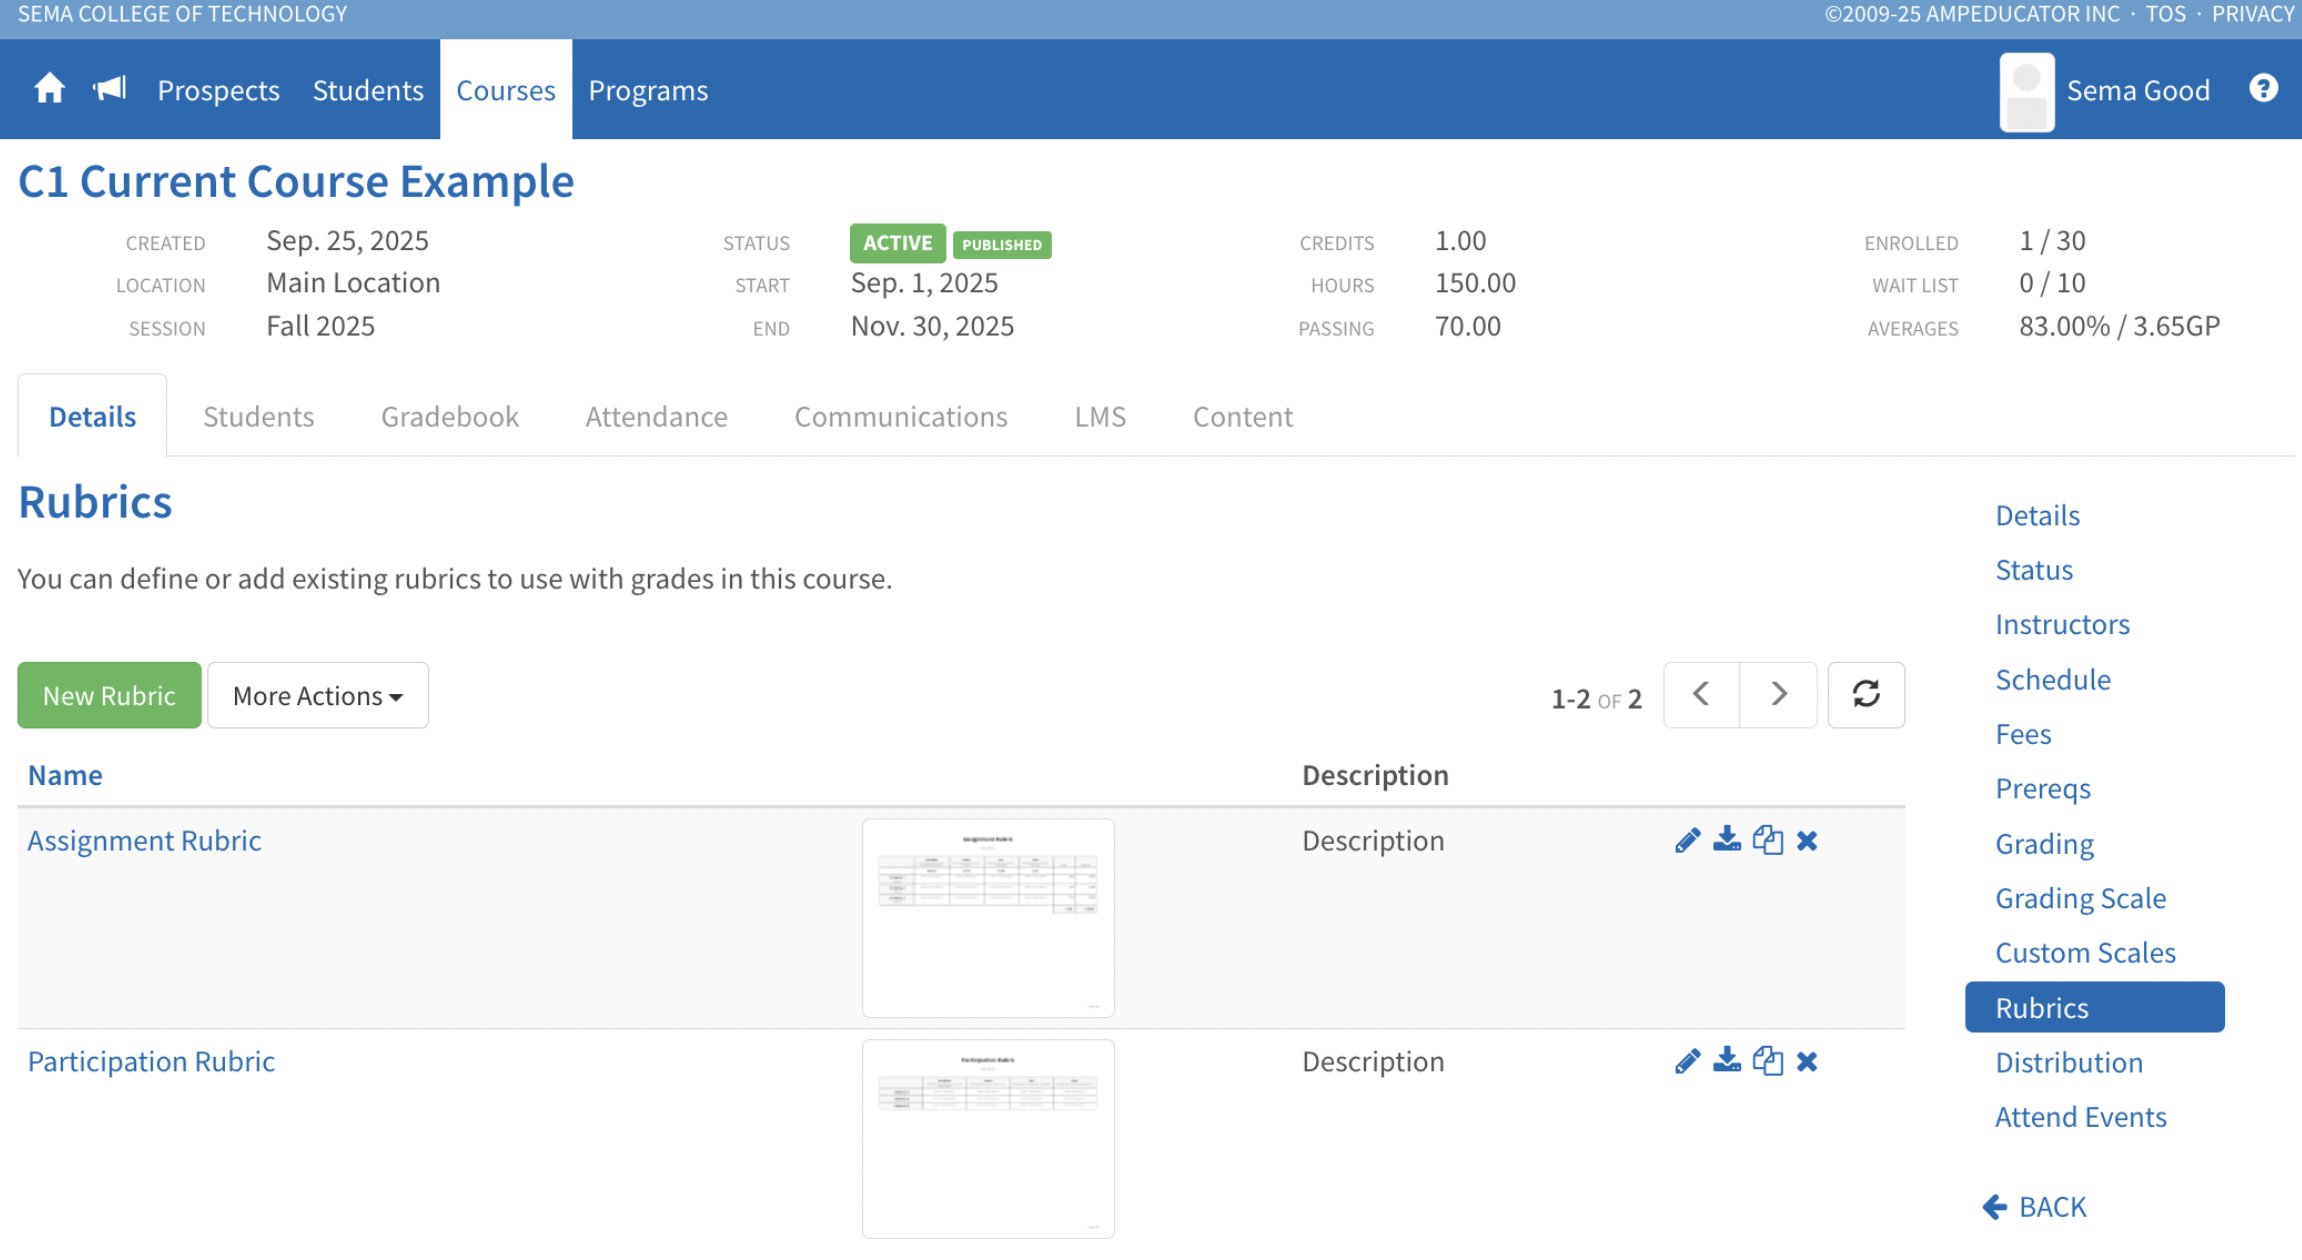
Course & Course Template / Rubrics
Attach rubrics you’ll use in a Course or preload them in a Course Template.
- Click New Rubric to create one here (same flow as the bank), or choose More Actions → Add Rubric from Existing to pull from the bank.
- Rubrics added in a Course are immediately available to attach to Assignments, Discussions, and grades without an online submission page.
- Rubrics added in a Course Template are copied into new Courses created from that template (existing Courses are unchanged).
Grading Schema (Attach Rubric to a Grade)
When creating a new course grade or editing an existing one in the Grading Schema, switch With Rubric to Yes, and choose the rubric from the dropdown. This works for Assignment, Discussion, and None (no online submission) grade link types.

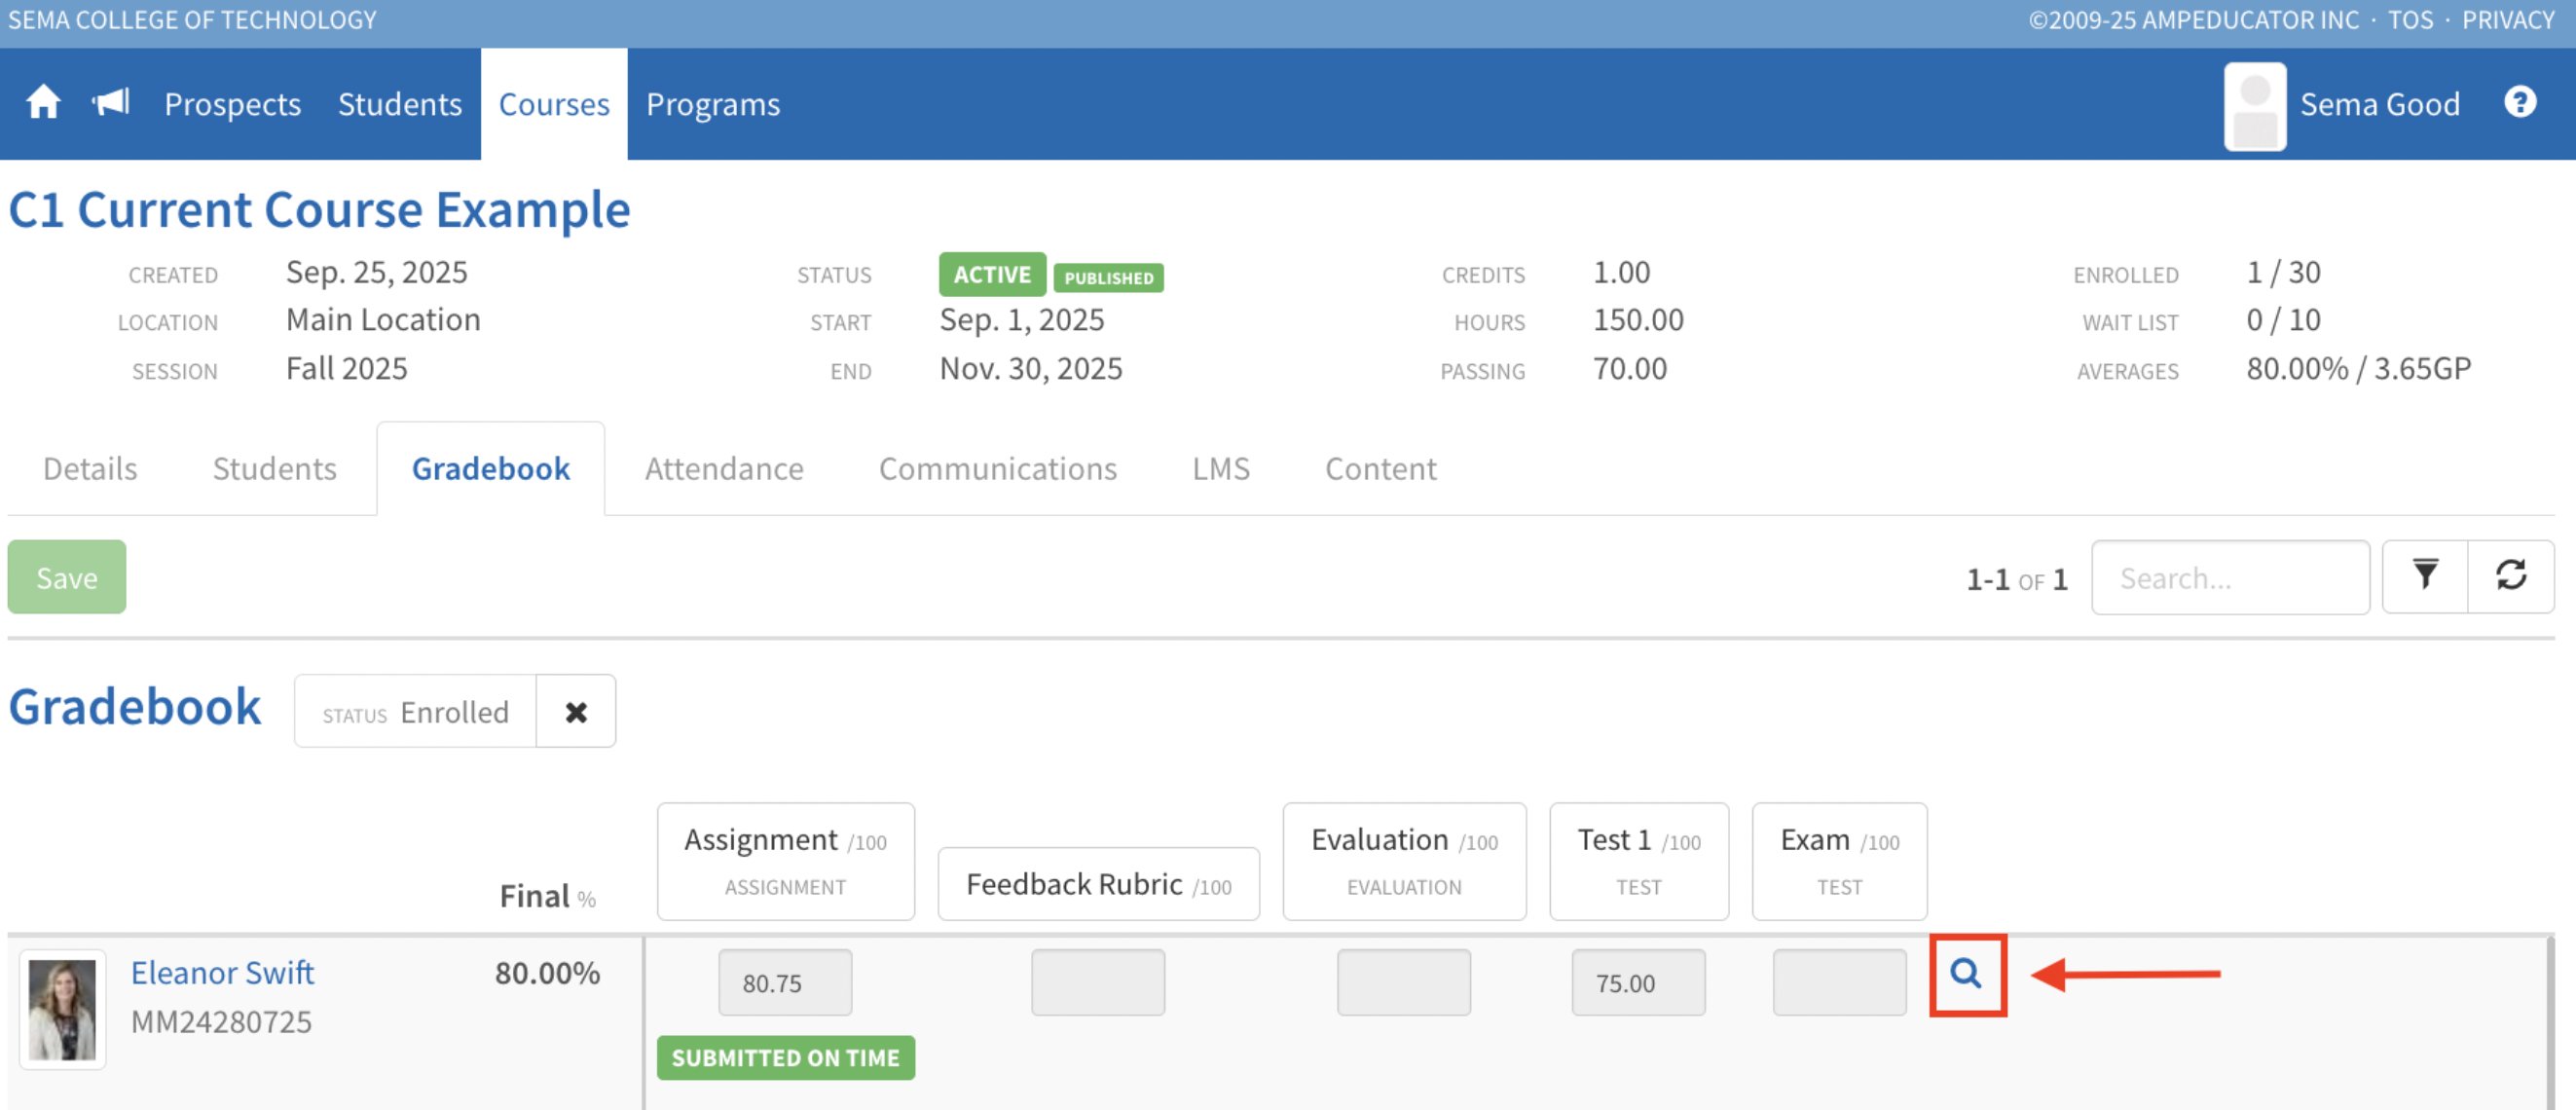
Gradebook & Individual Student view
From the Gradebook, you can grade with rubrics in place. For Assignments and Discussions, open the clipboard to the Feedback & Mark panel where the rubric appears inline. For items without an online submission page, use the rubric icon in the grid to open and complete the rubric; if it’s feedback-only and a numeric mark is required, enter the mark in the grid and Save.
Simply select the levels by clicking on them.
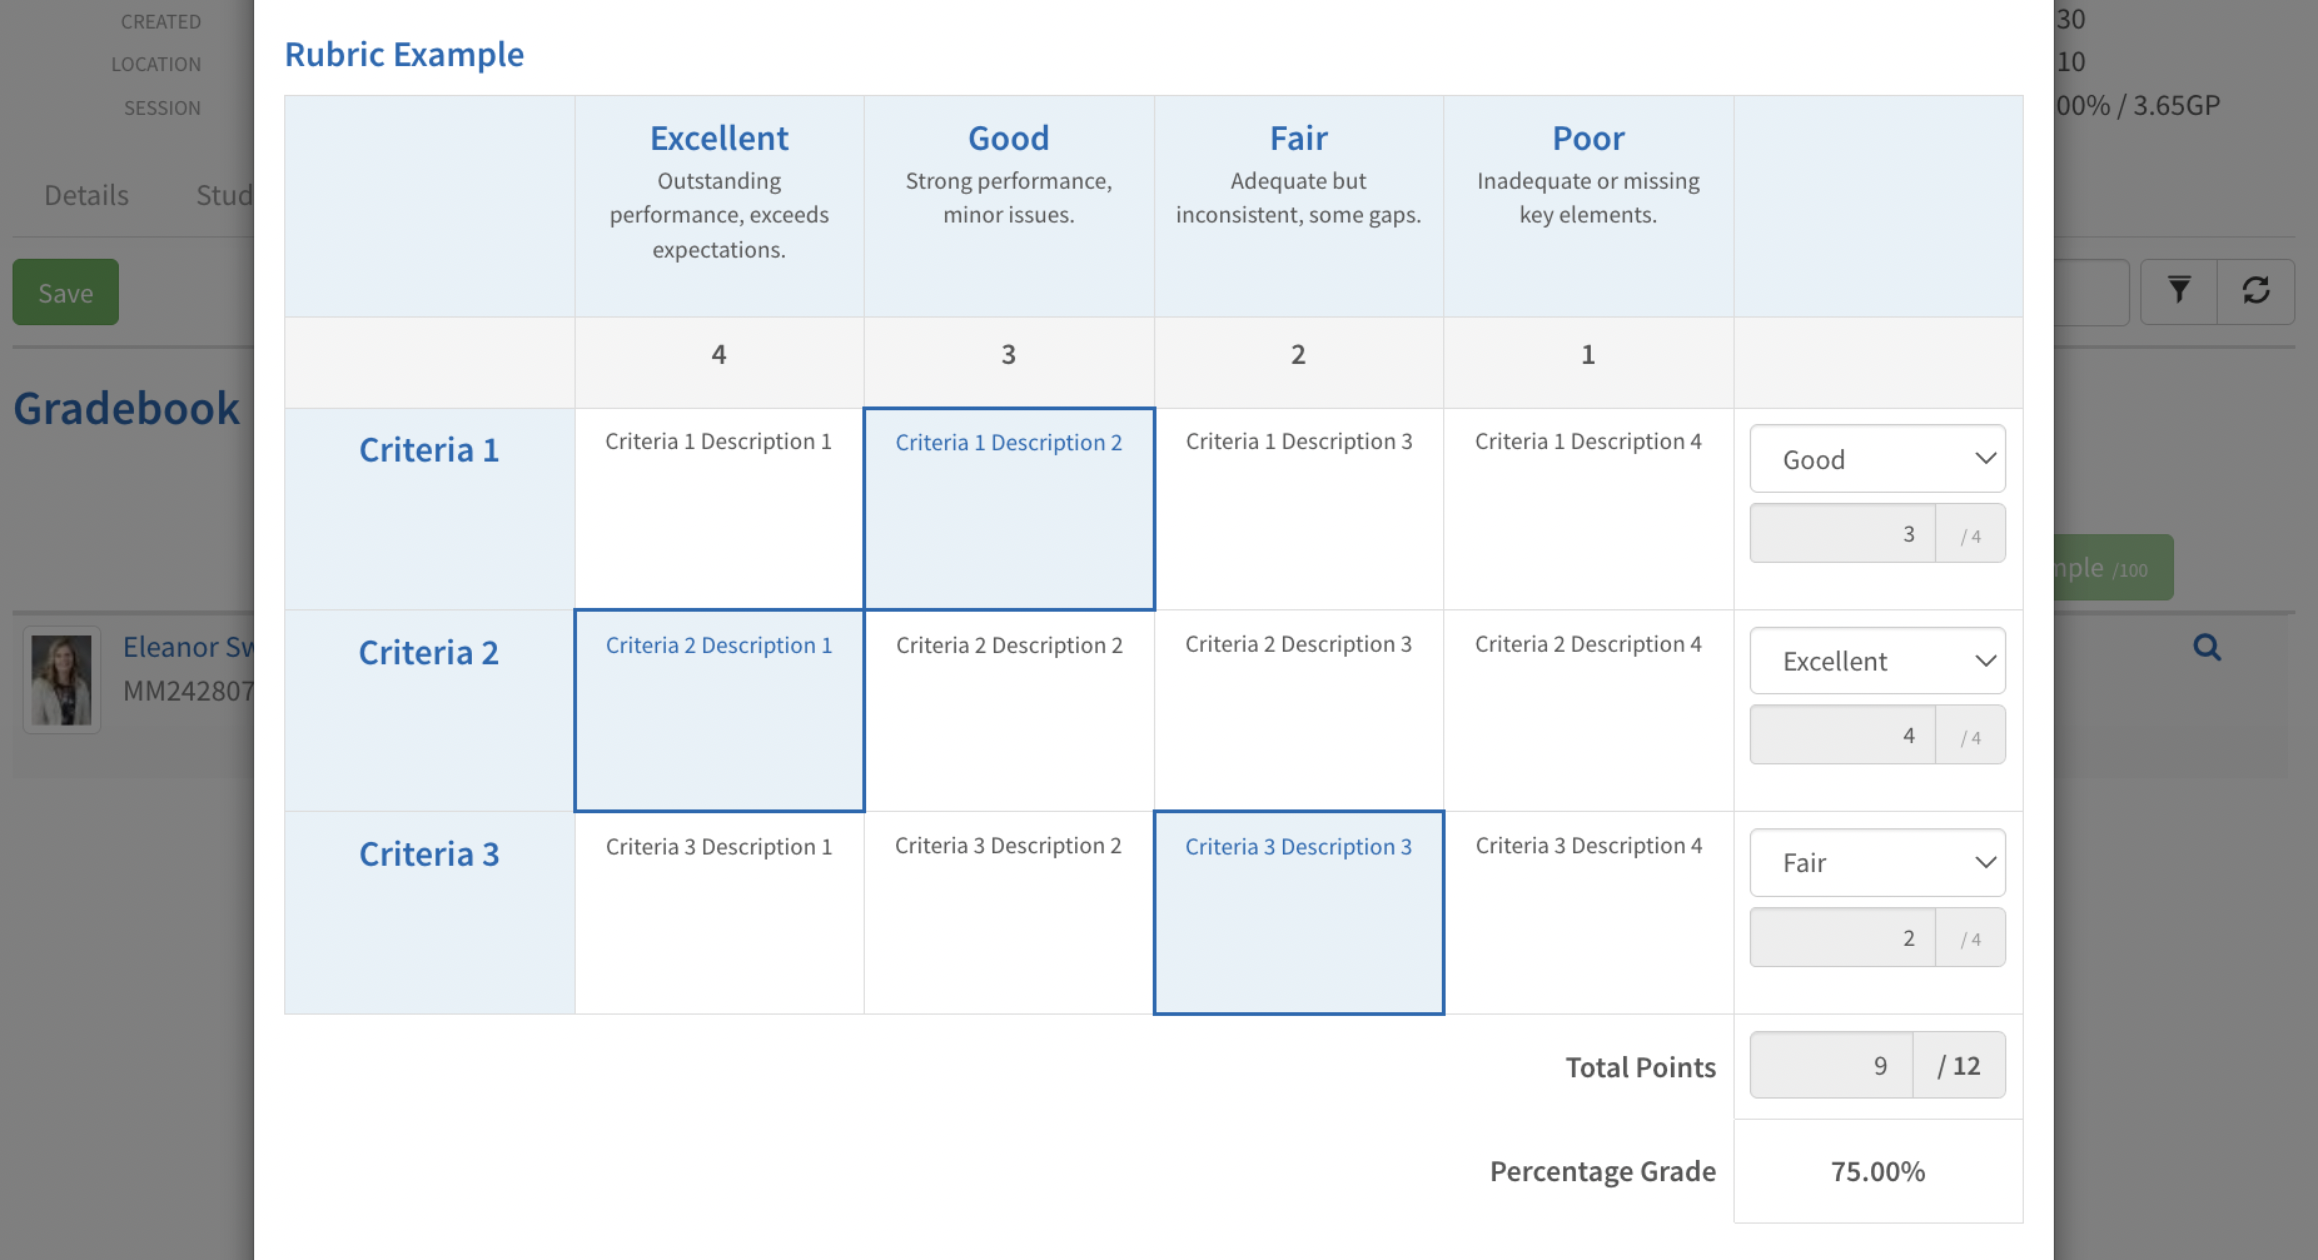
To work with one learner at a time, open the magnifying glass (Individual Student view); the same clipboard and rubric icons are available there.
Student Portal
Before marking, attached rubrics appear on the assignment or discussion page so students can review the criteria. After you publish, students can open the completed rubric on the item’s feedback and from the course Grades tab via the green View Grading Rubric button. For grades without an online submission page, students access the rubric from Grades.

🎥 Video Walkthrough: Rubrics
Add Assignments & Tests to Course Content
Release Date: September 23, 2025
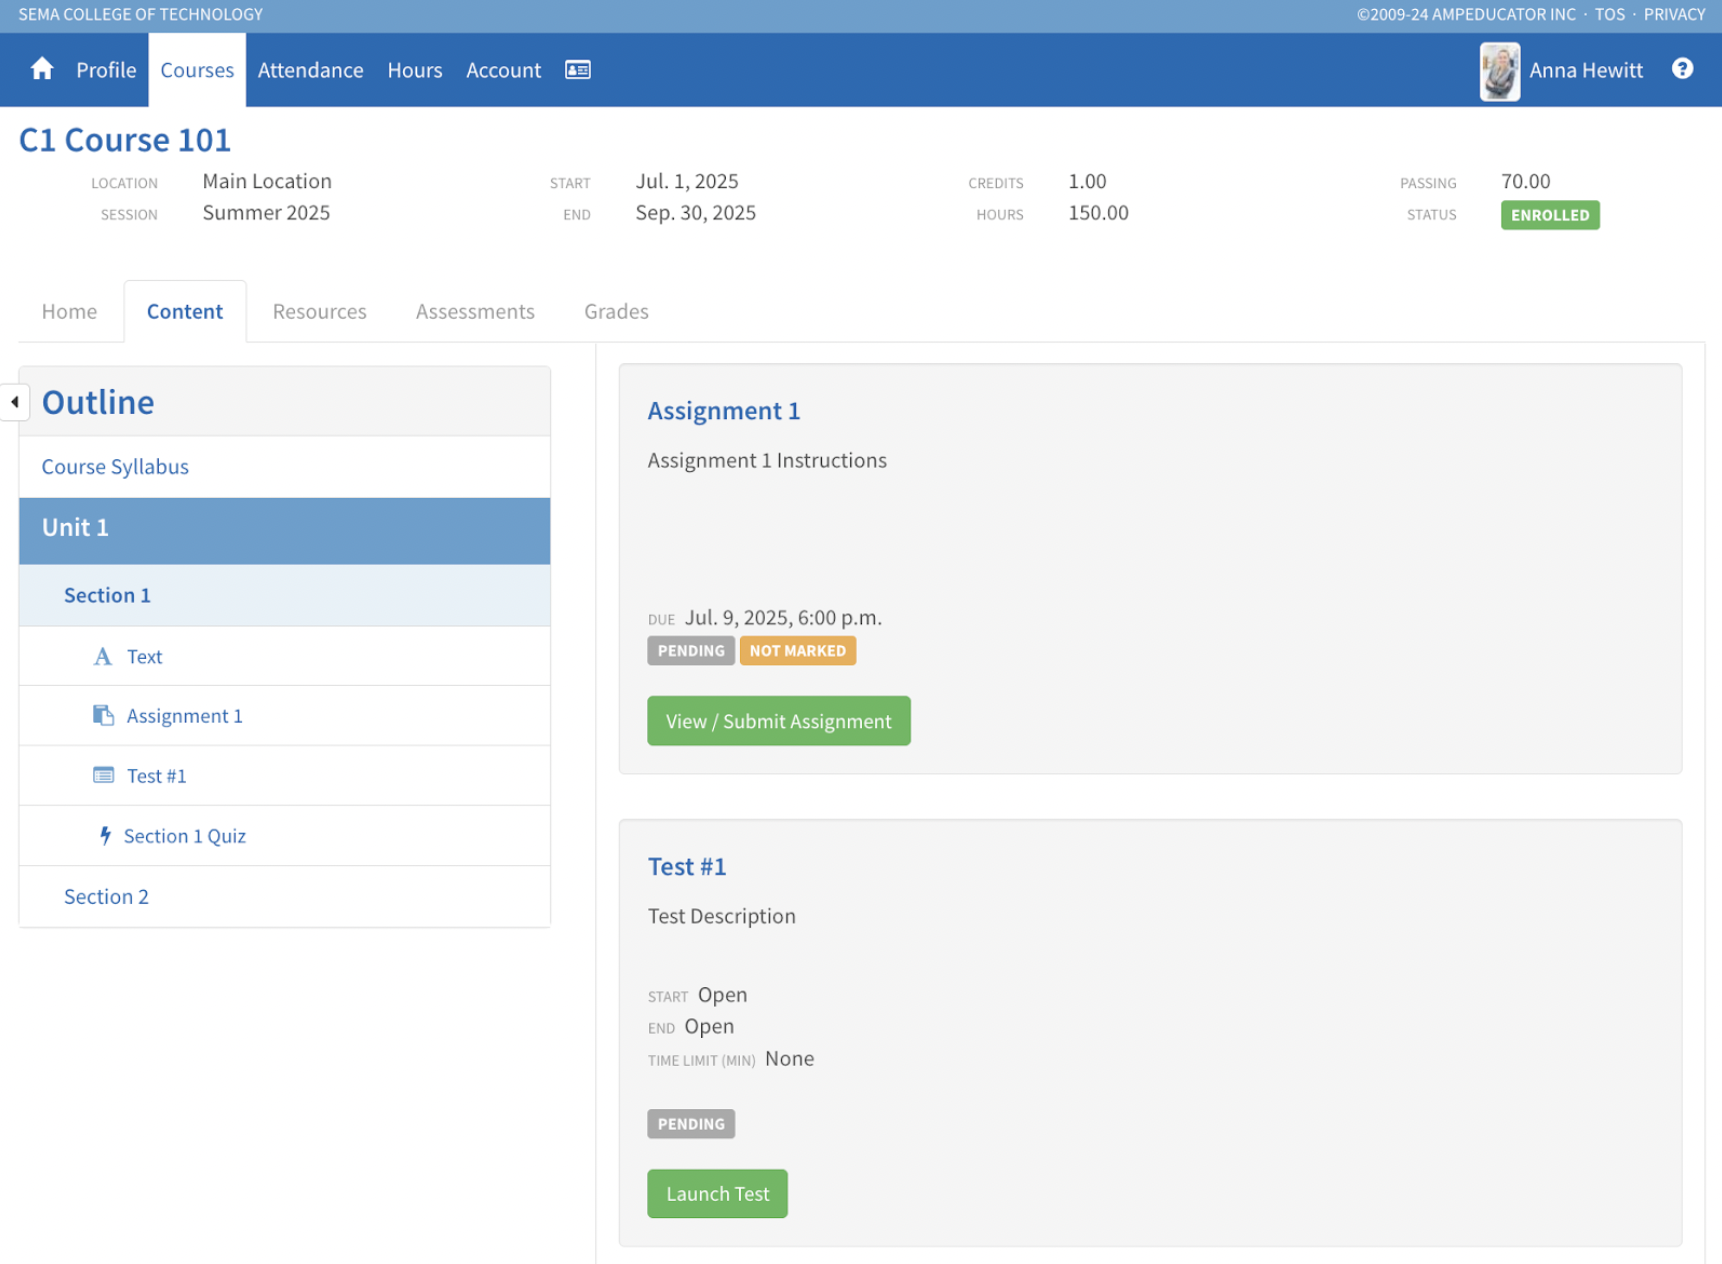
You can now insert assignments and tests directly into a course’s content area, making them part of the overall learning flow. This allows students to access, complete, and track these items from the course’s Content tab in the Student Portal.
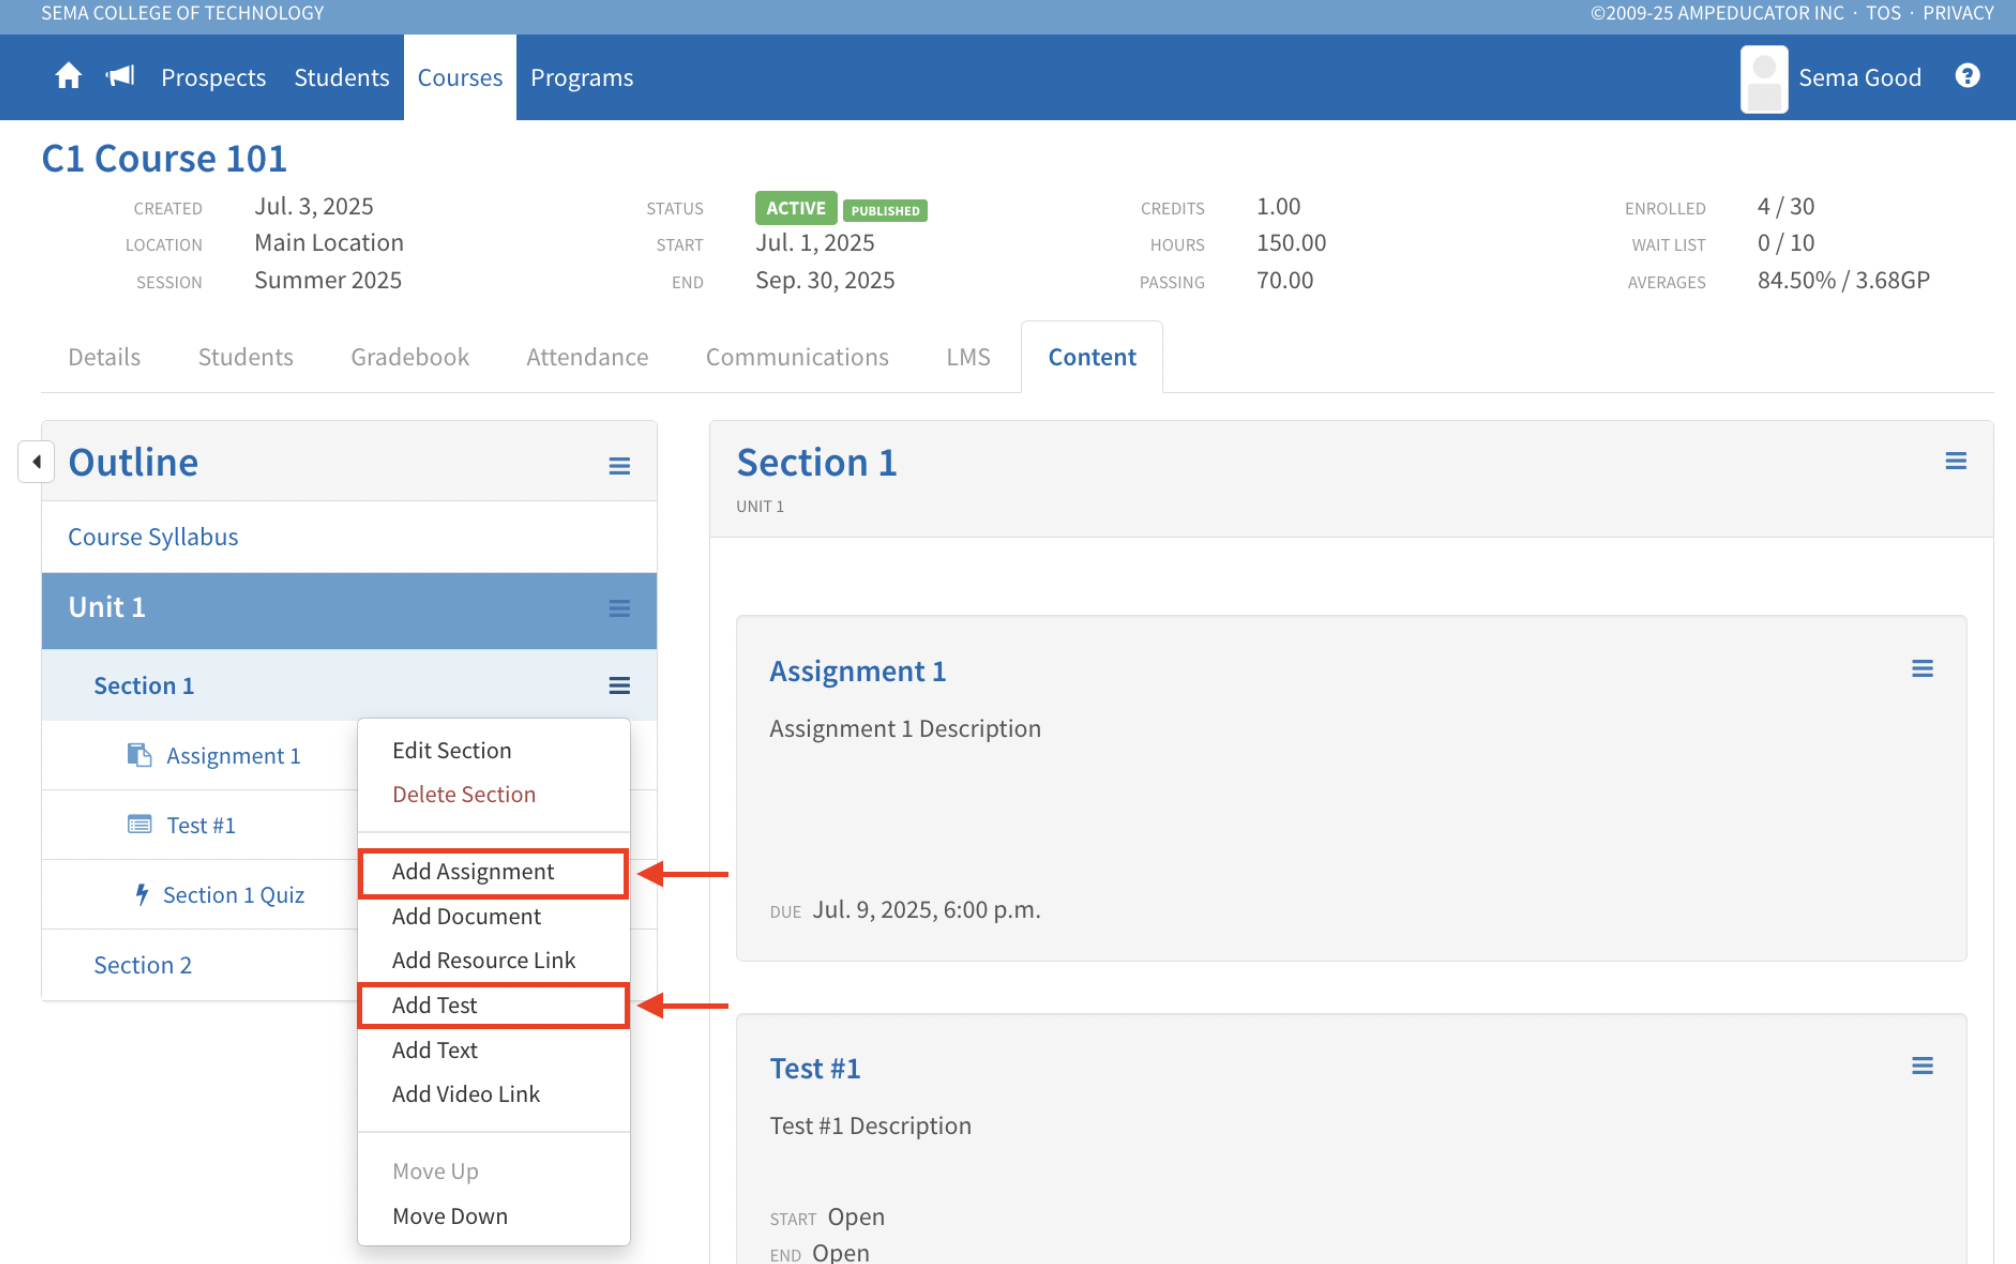
When adding an assignment or test, you can:
- Choose from existing assignments or tests already linked in your grading schema.
- Set a custom item title and description.
- Use the Enclose In Box option to visually separate the item in the content list.
Once added, assignments and tests display alongside other course materials. In the Student Portal:
- Assignments include a Submit Assignment button.
- Tests include a Launch Test button when available.
- Items are marked complete once the assignment is submitted and graded, or once the test is marked.
Course Marketplace Updates
Release Date: September 17, 2025
Several updates have been made to improve the Course Marketplace based on user feedback and general usage.
Enrollment Student Action Option
A new option called Enrollment Student Action has been added to the Details section of a course in the Course Marketplace. This option only appears when the Enrollment Method is set to Manually Enroll.
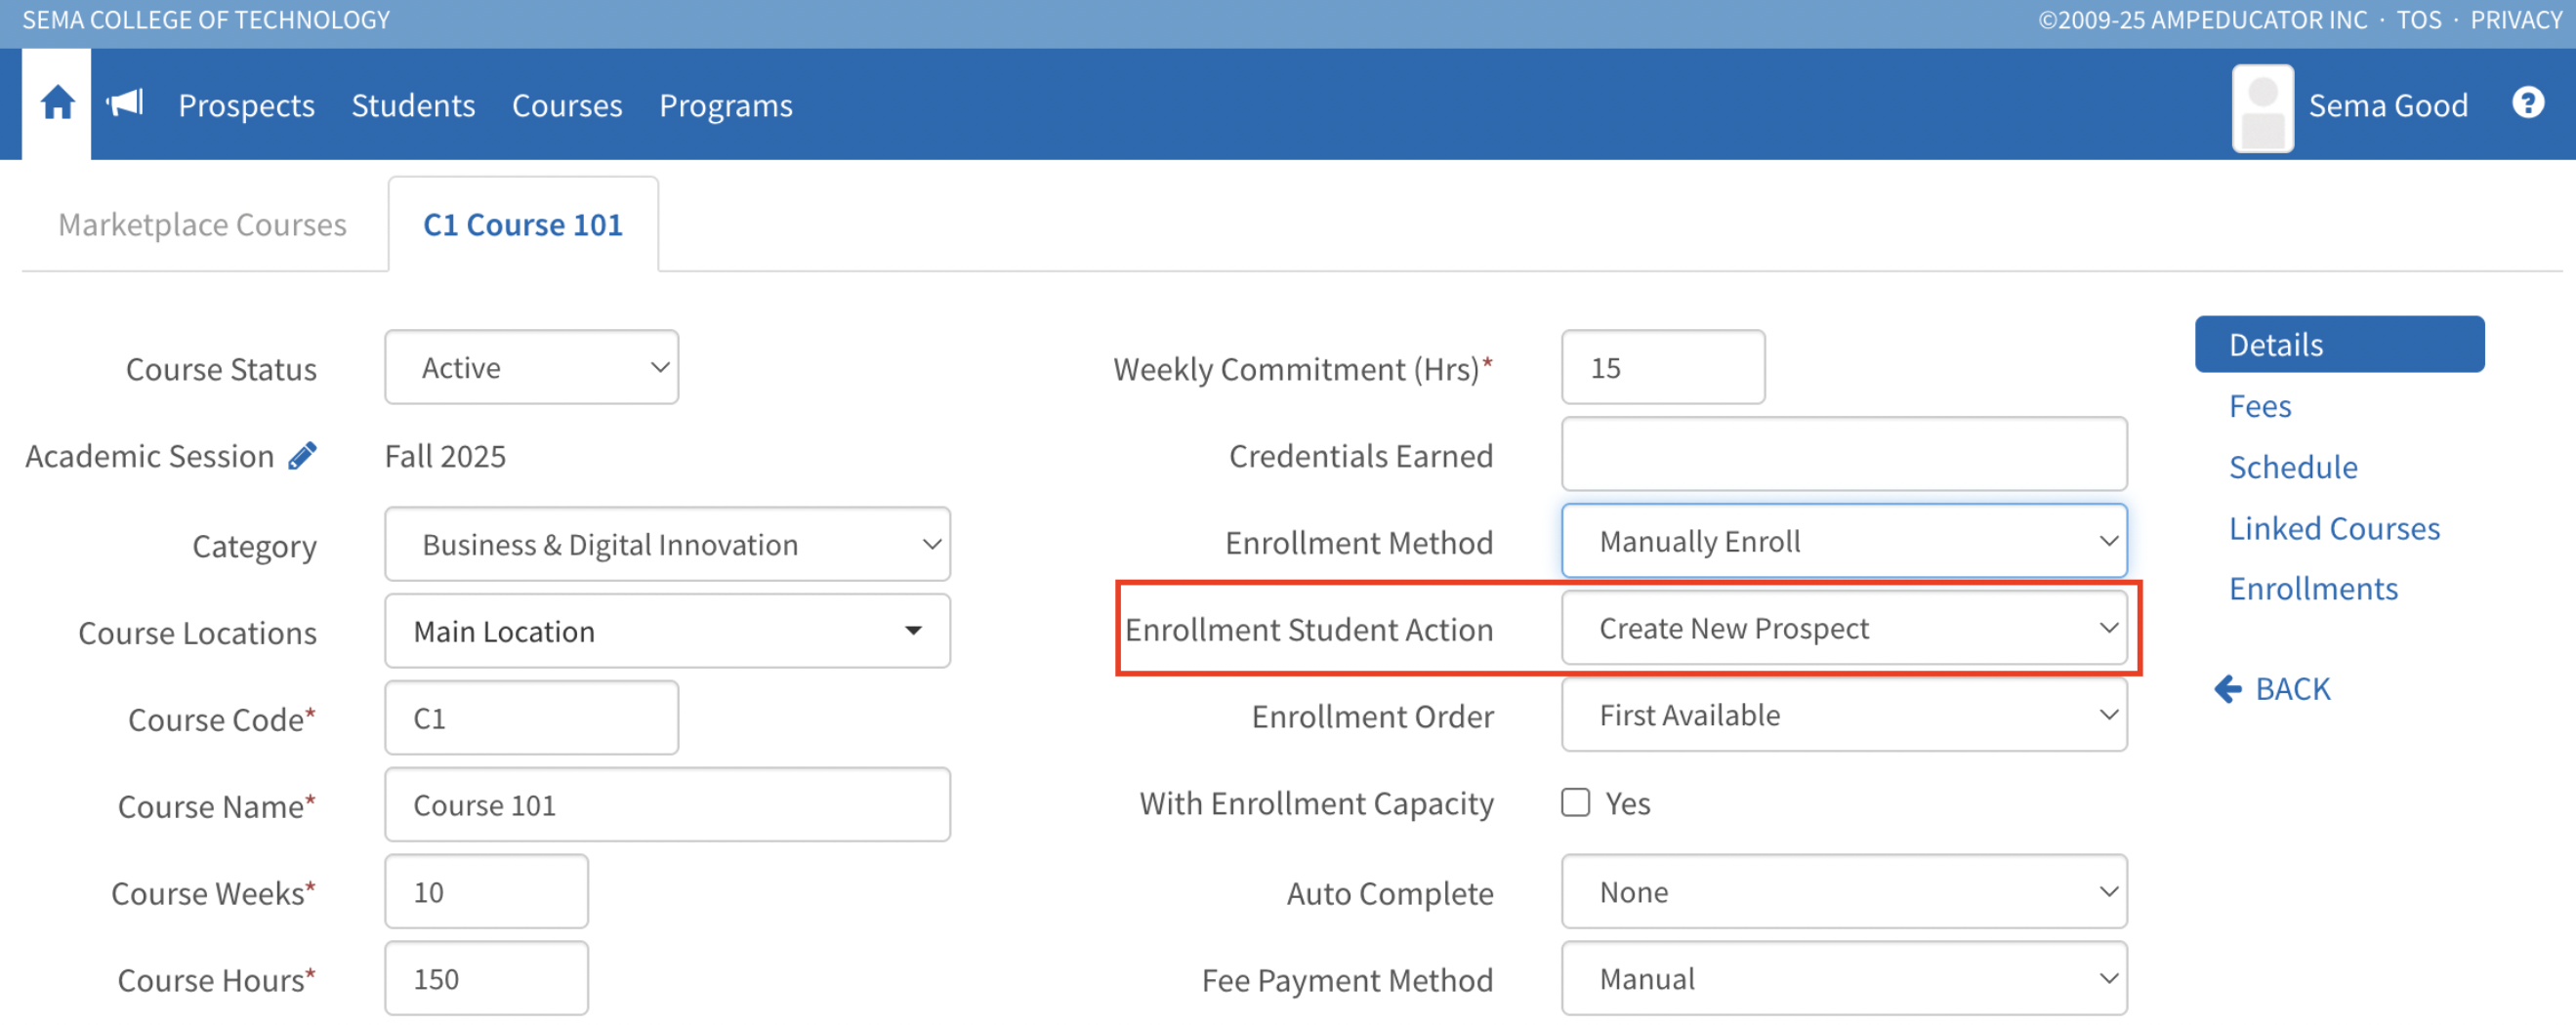
This option replaces the old placeholder student process. Now, each request is automatically created as either a Prospect or a Student, giving immediate access to an account and profile.
ℹ️ If a Student ID or email matches an existing record, the request will automatically merge with that student’s profile.
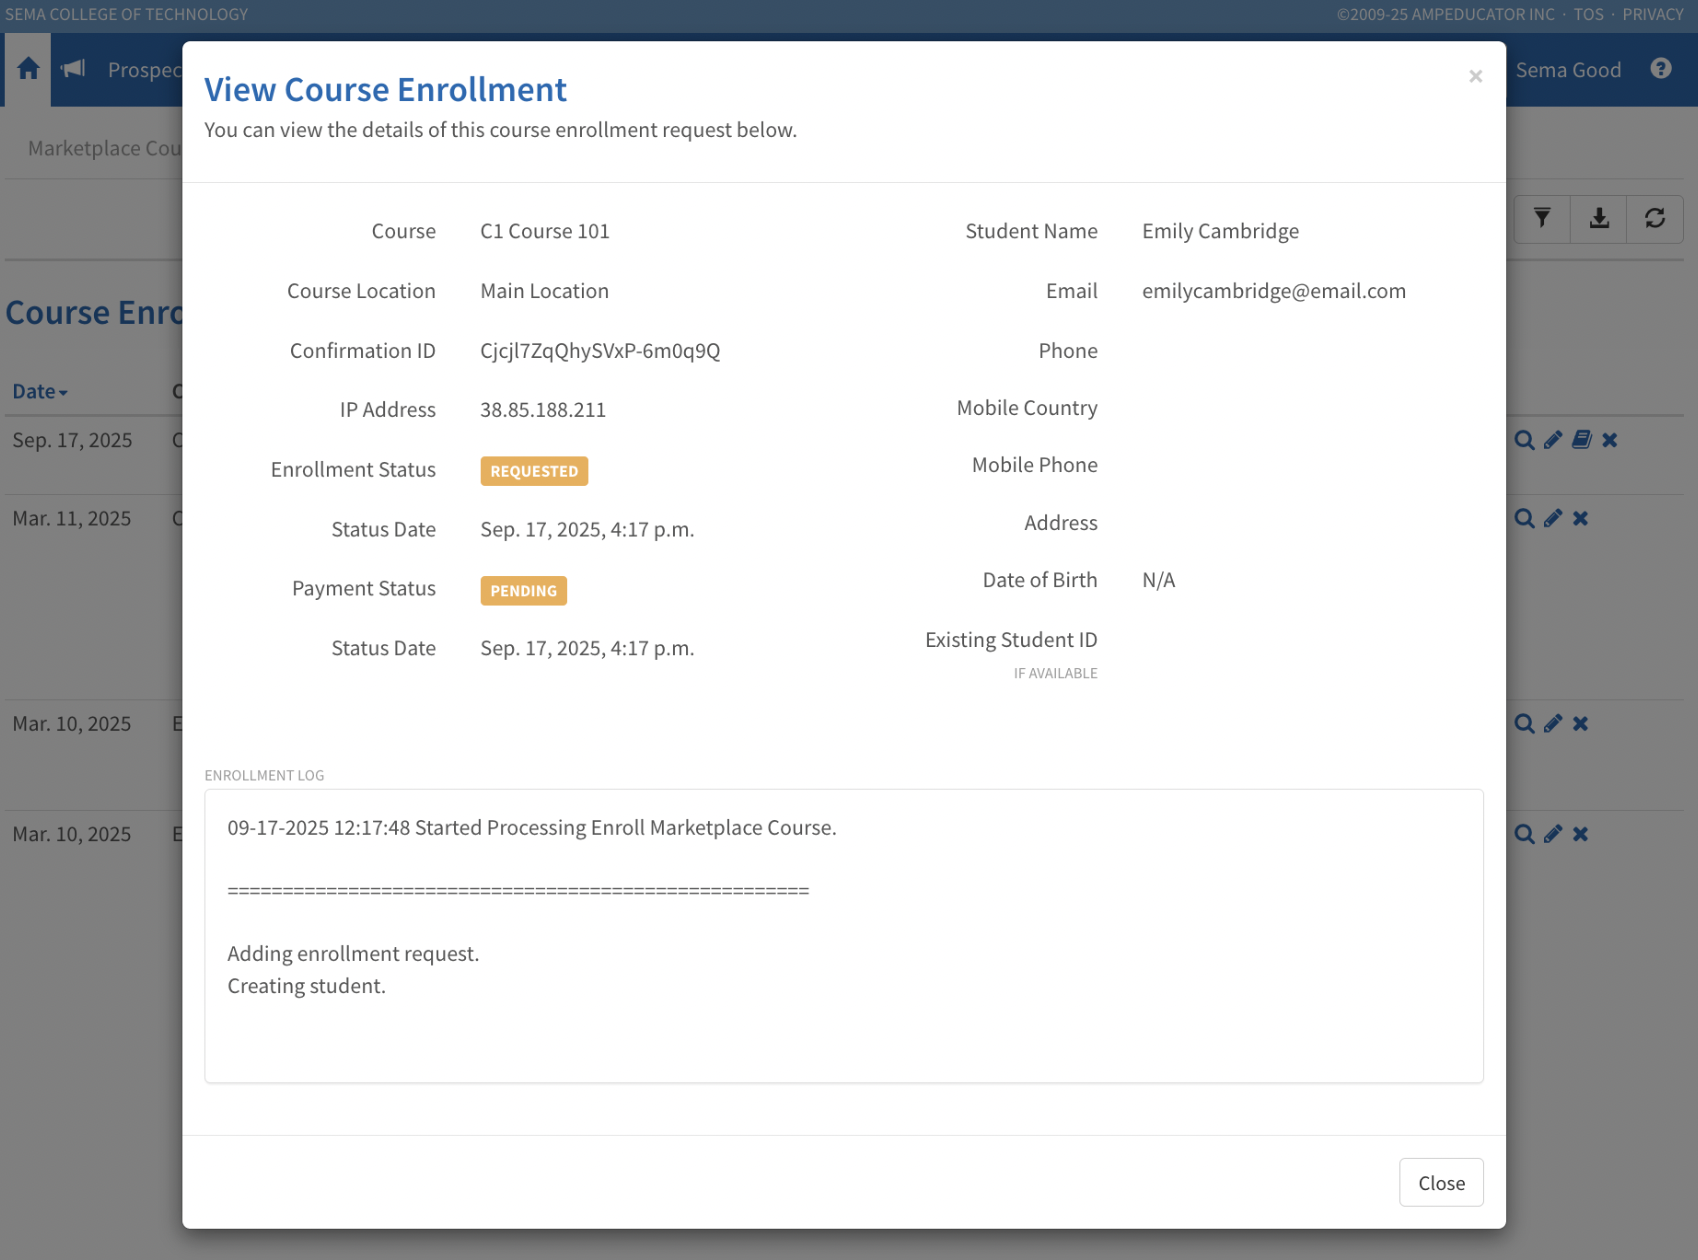
View Enrollment Changes
You can access enrollment request details by clicking the View Enrollment button, either from the Course Enrollments section of a Marketplace course or from the Enrollment Requests tab in the Course Marketplace.
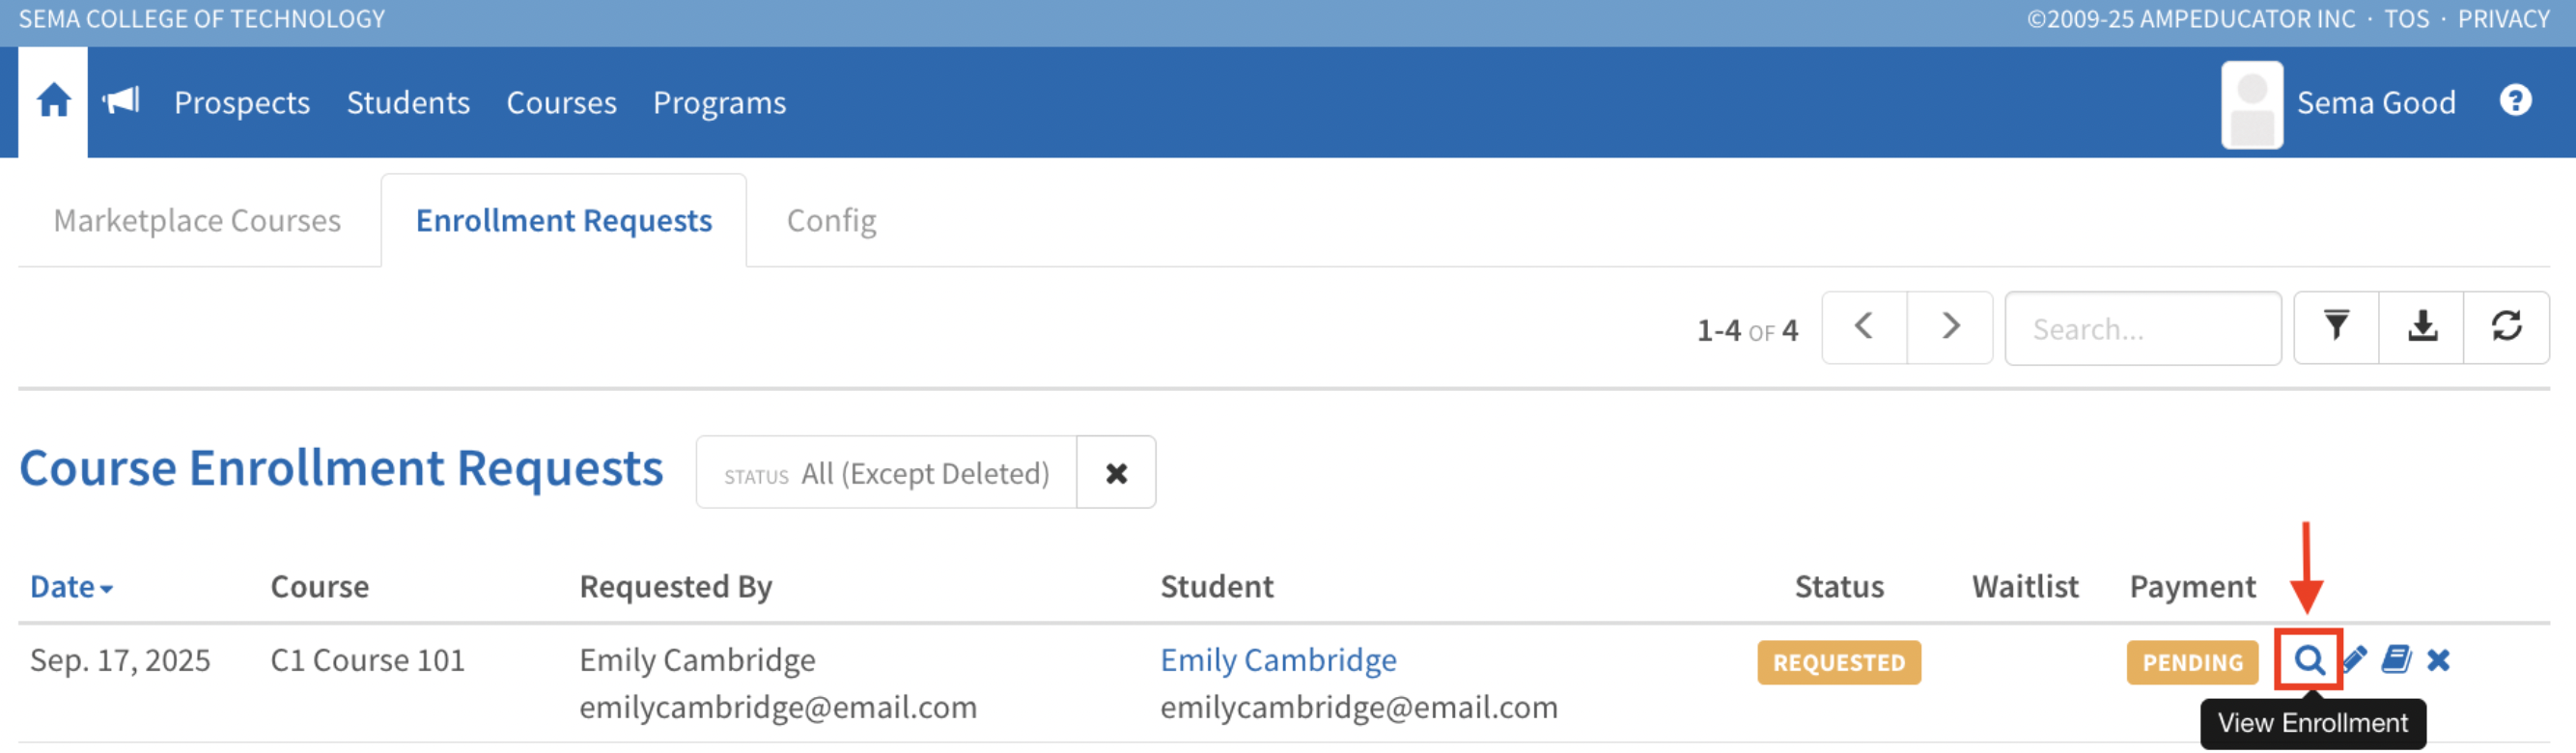
The option to choose between associating the request with an existing student or creating a new one has been removed. This view now simply displays the enrollment request details, including student information, enrollment status, payment status, and timestamps.
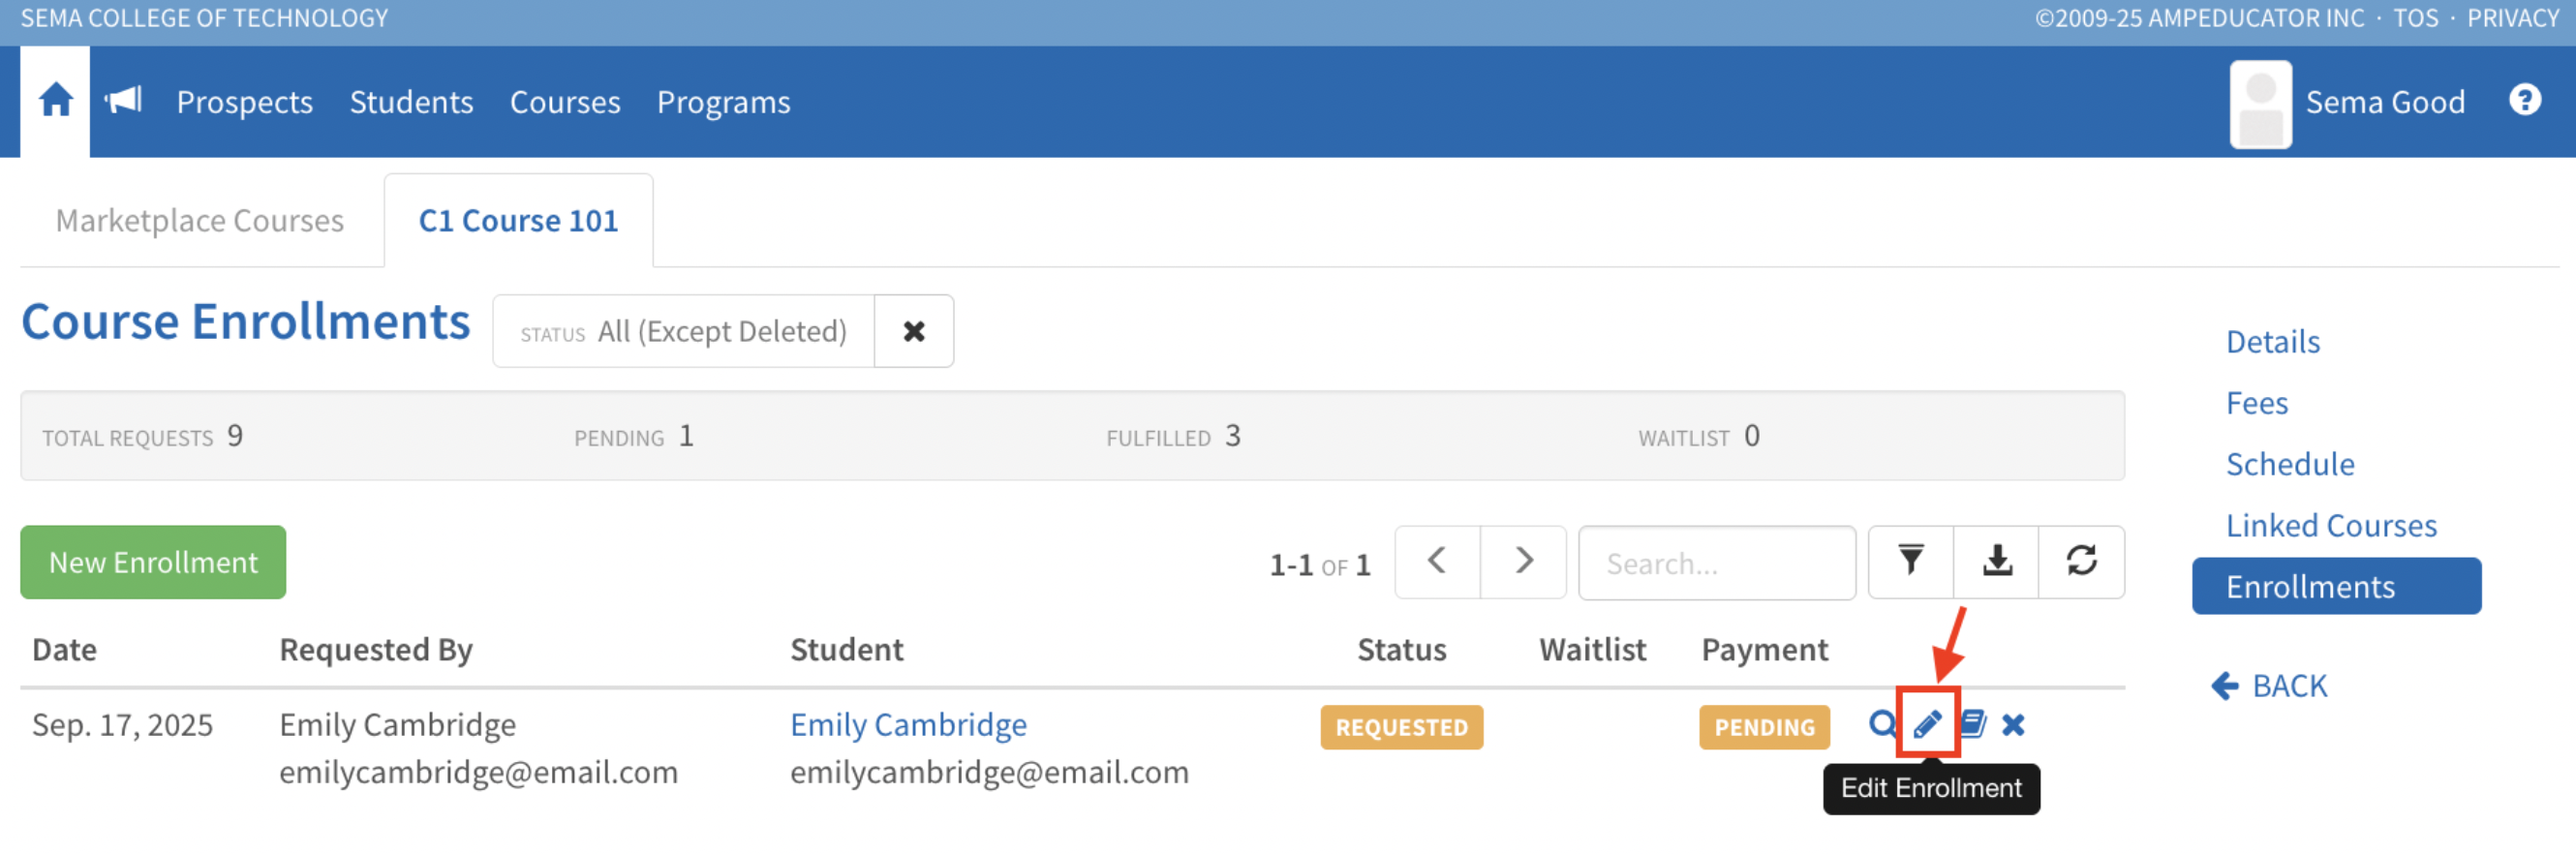
New Edit Enrollment Icon
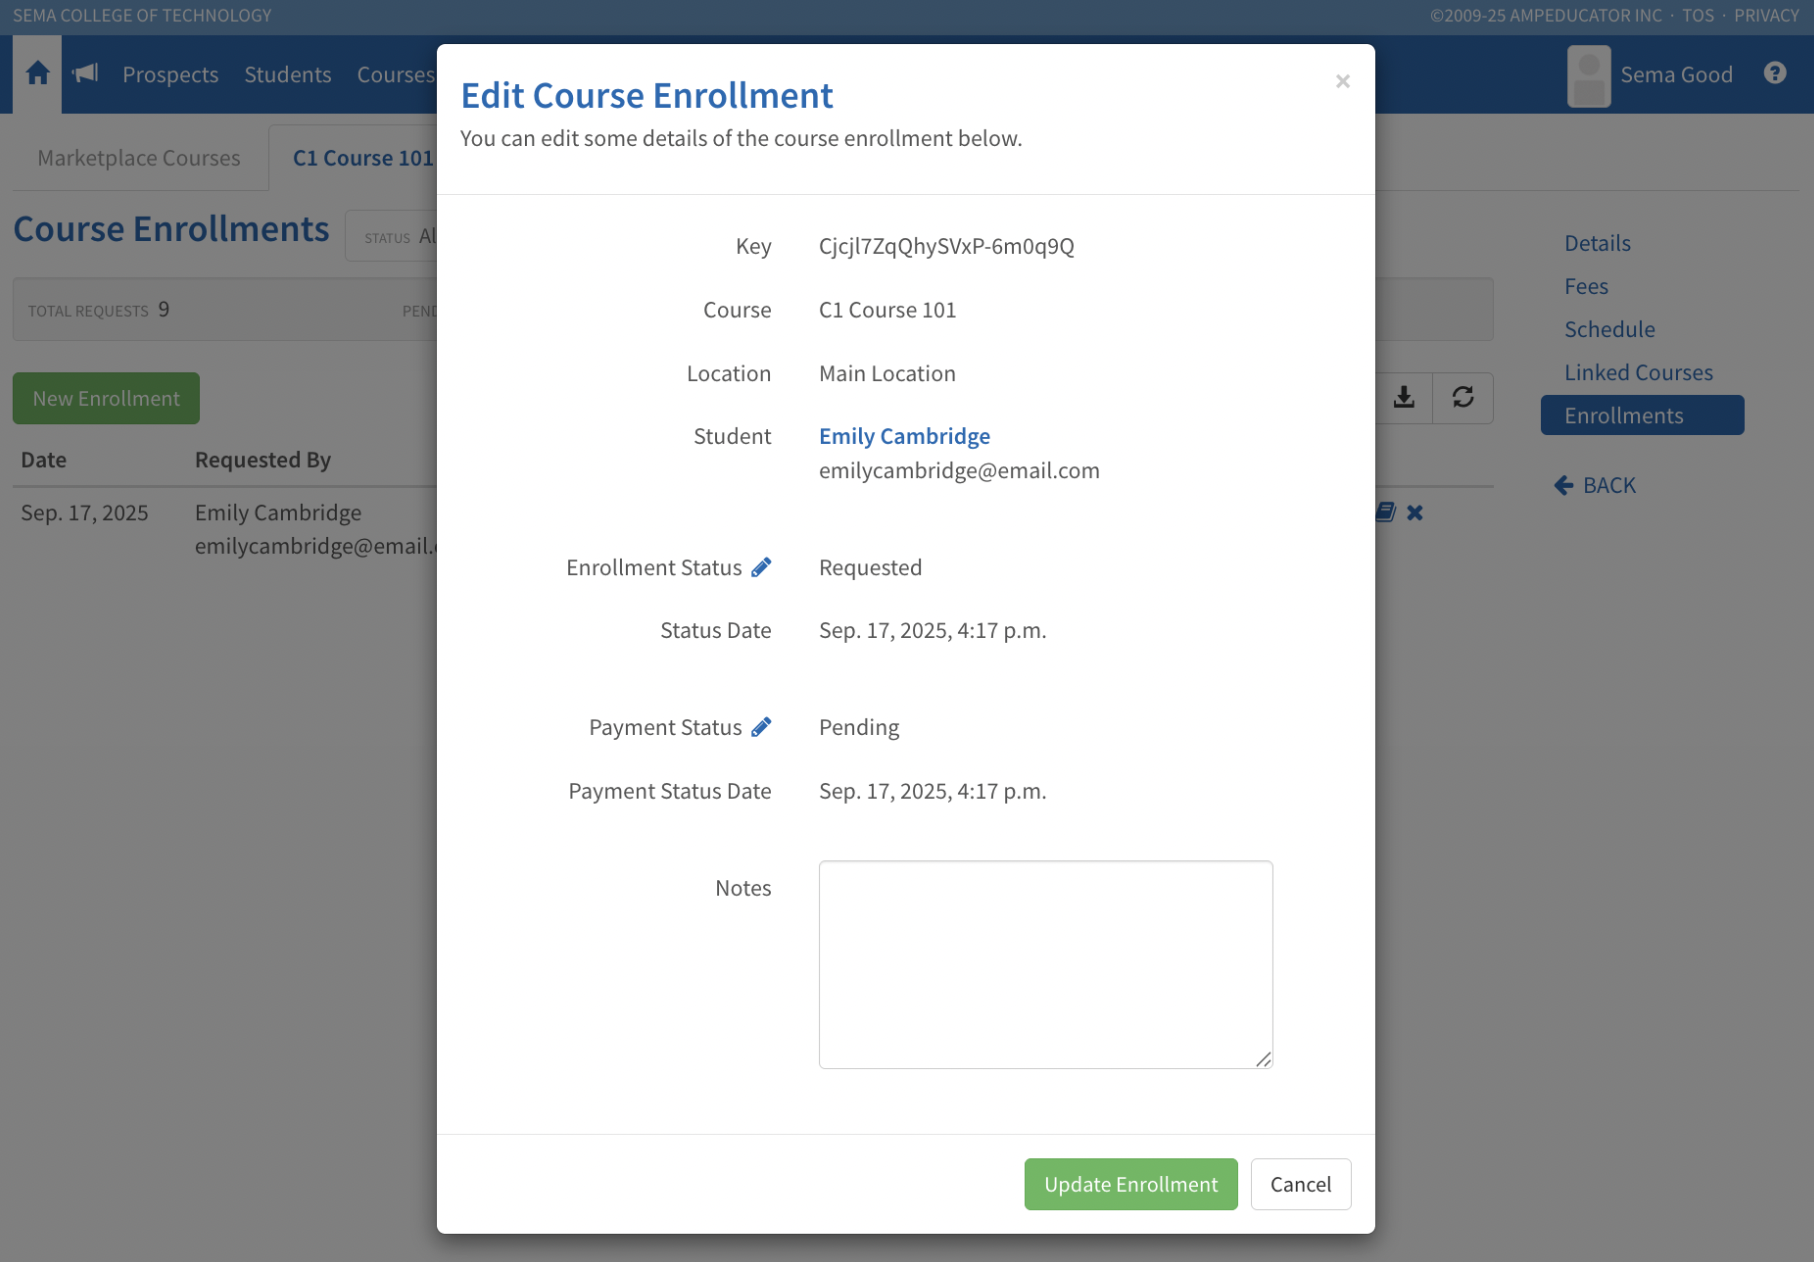
A new option to edit enrollment requests has been added. You can access it by clicking the Edit Enrollment button, either from the Course Enrollments section of a course or from the Enrollment Requests tab in the Course Marketplace.
When you open the edit modal, you can update the enrollment status, adjust the status date, change the payment status, update the payment status date, and add internal notes to keep the request accurate and up to date.
Enroll Student Changes
Two changes have been made when processing enrollments through the Enroll Student icon in either the Course Enrollments section or the Enrollment Requests tab:
- The option to Convert to Student Only has been removed, since all requests are now always tied to either a Prospect or a Student.
- A new Charge Method option called None has been added, allowing you to finalize enrollments without applying any charges.

With these changes, you’ll find it easier to review, edit, and process enrollment requests directly from the Course Marketplace.
Course Engagement Tracking
Release Date: September 15, 2025
You can now track how much time Students spend actively engaging with course content in ampEducator. This update gives Instructors better insight into Student participation within individual courses.
Engagement Tracking Settings
Each course now includes two new settings in Content:
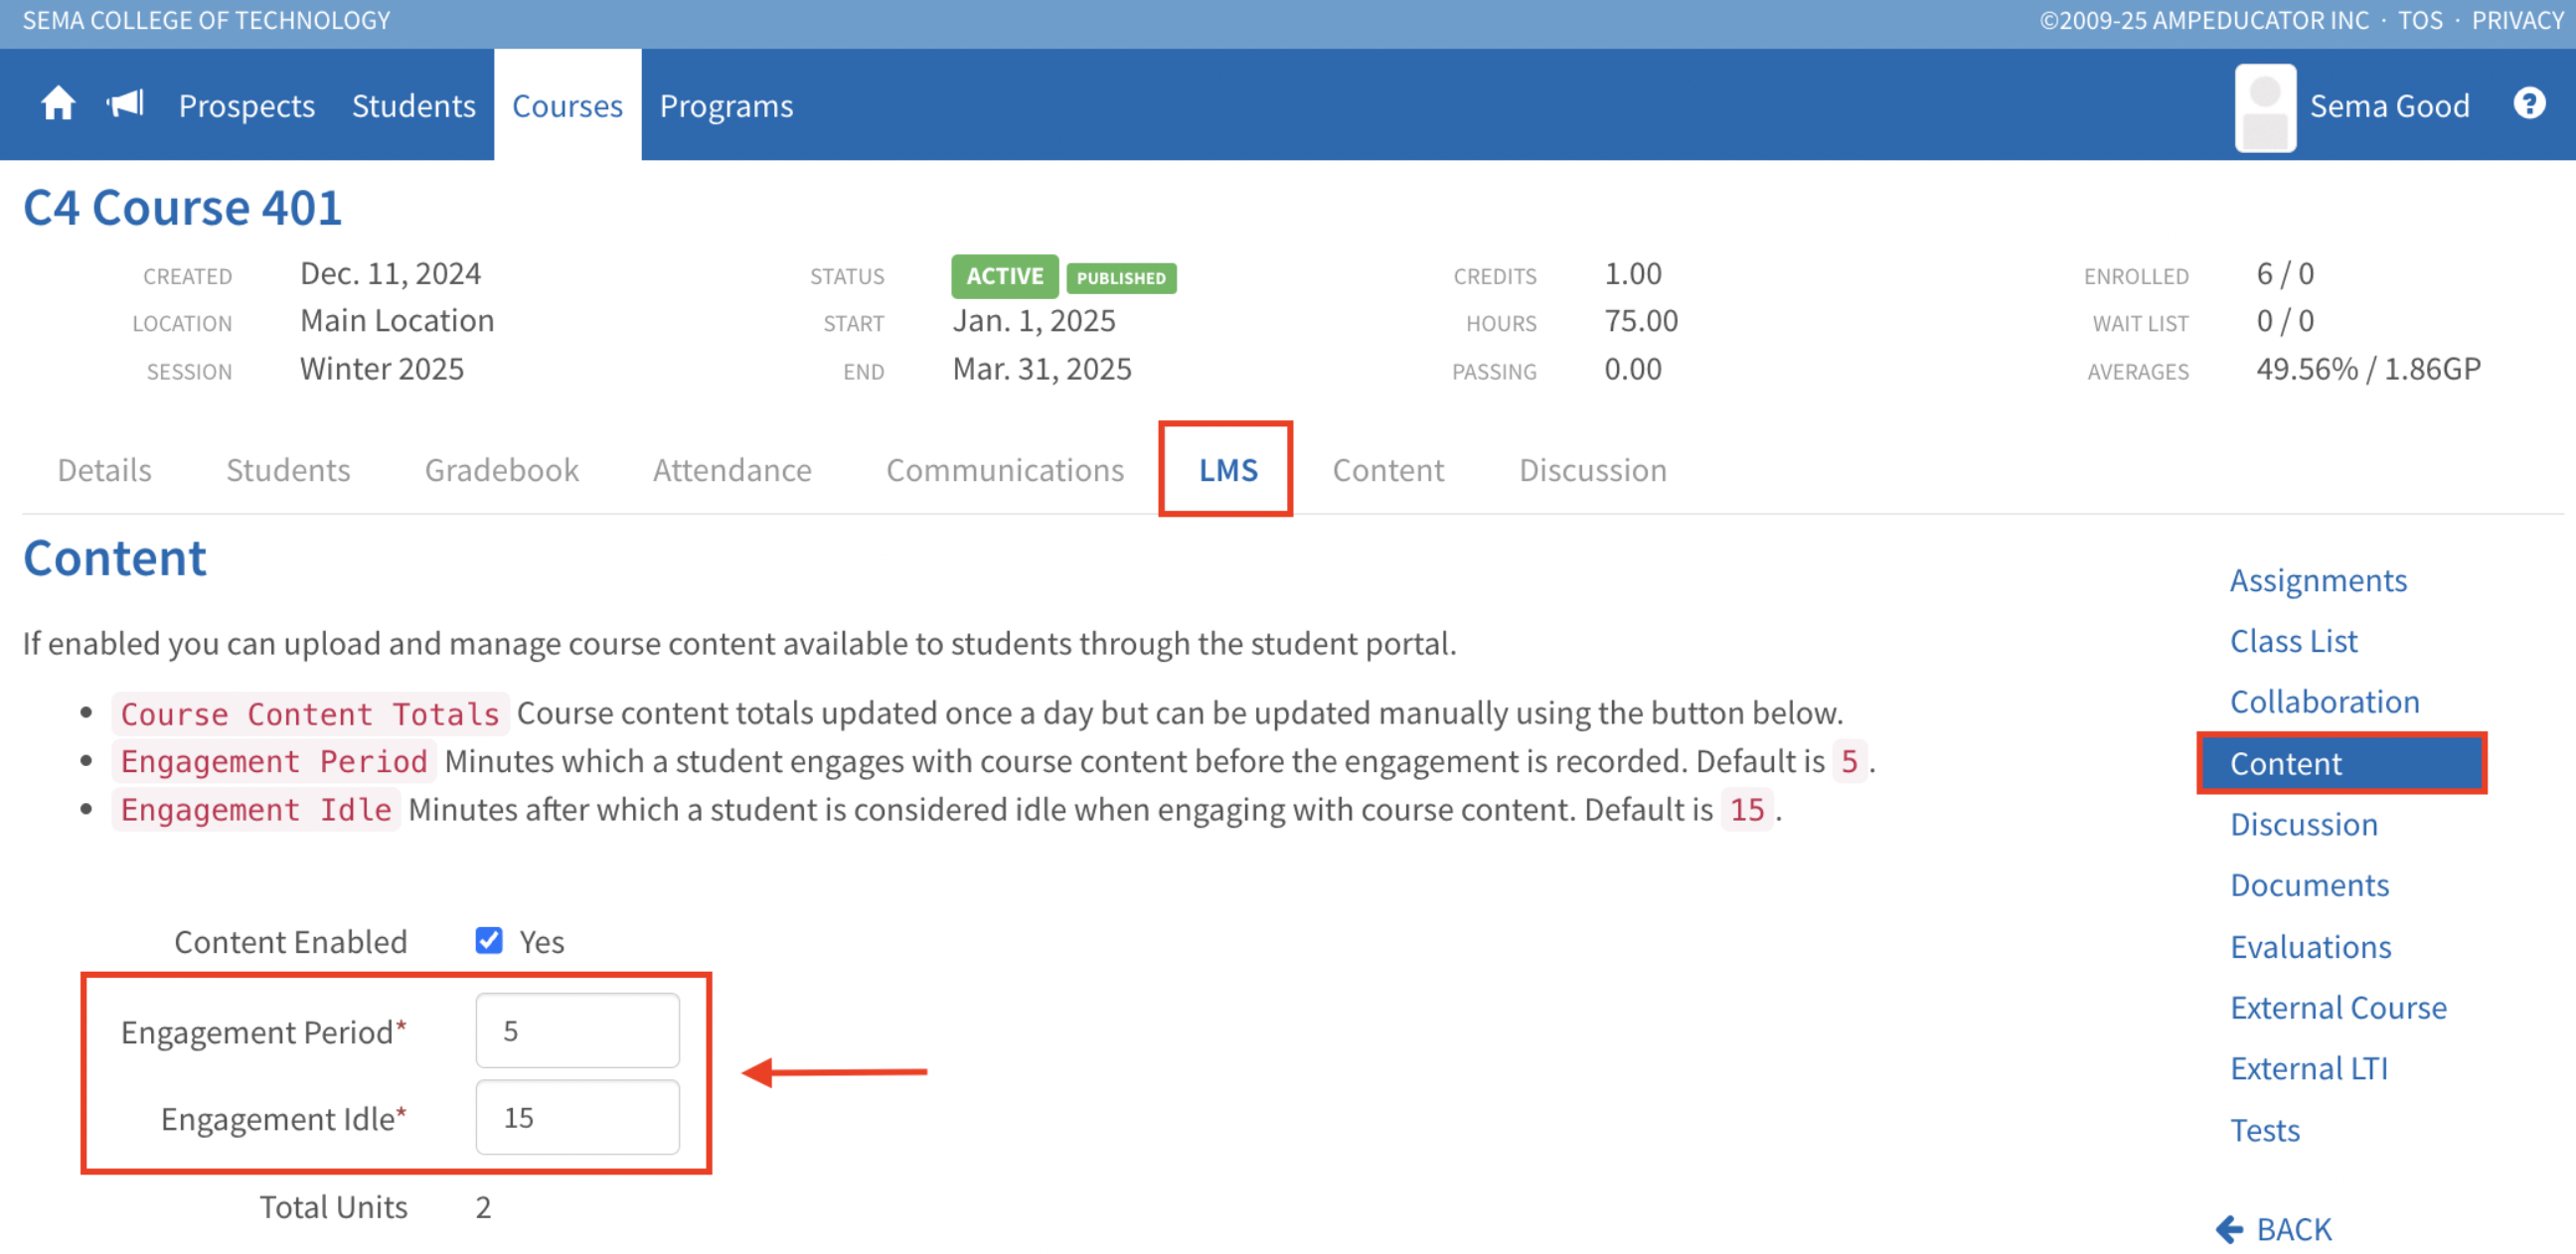
- Engagement Period: How long a Student must stay active before time is recorded (default is 5 minutes)
- Engagement Idle: The amount of idle time allowed before the system pauses engagement tracking (default is 15 minutes)
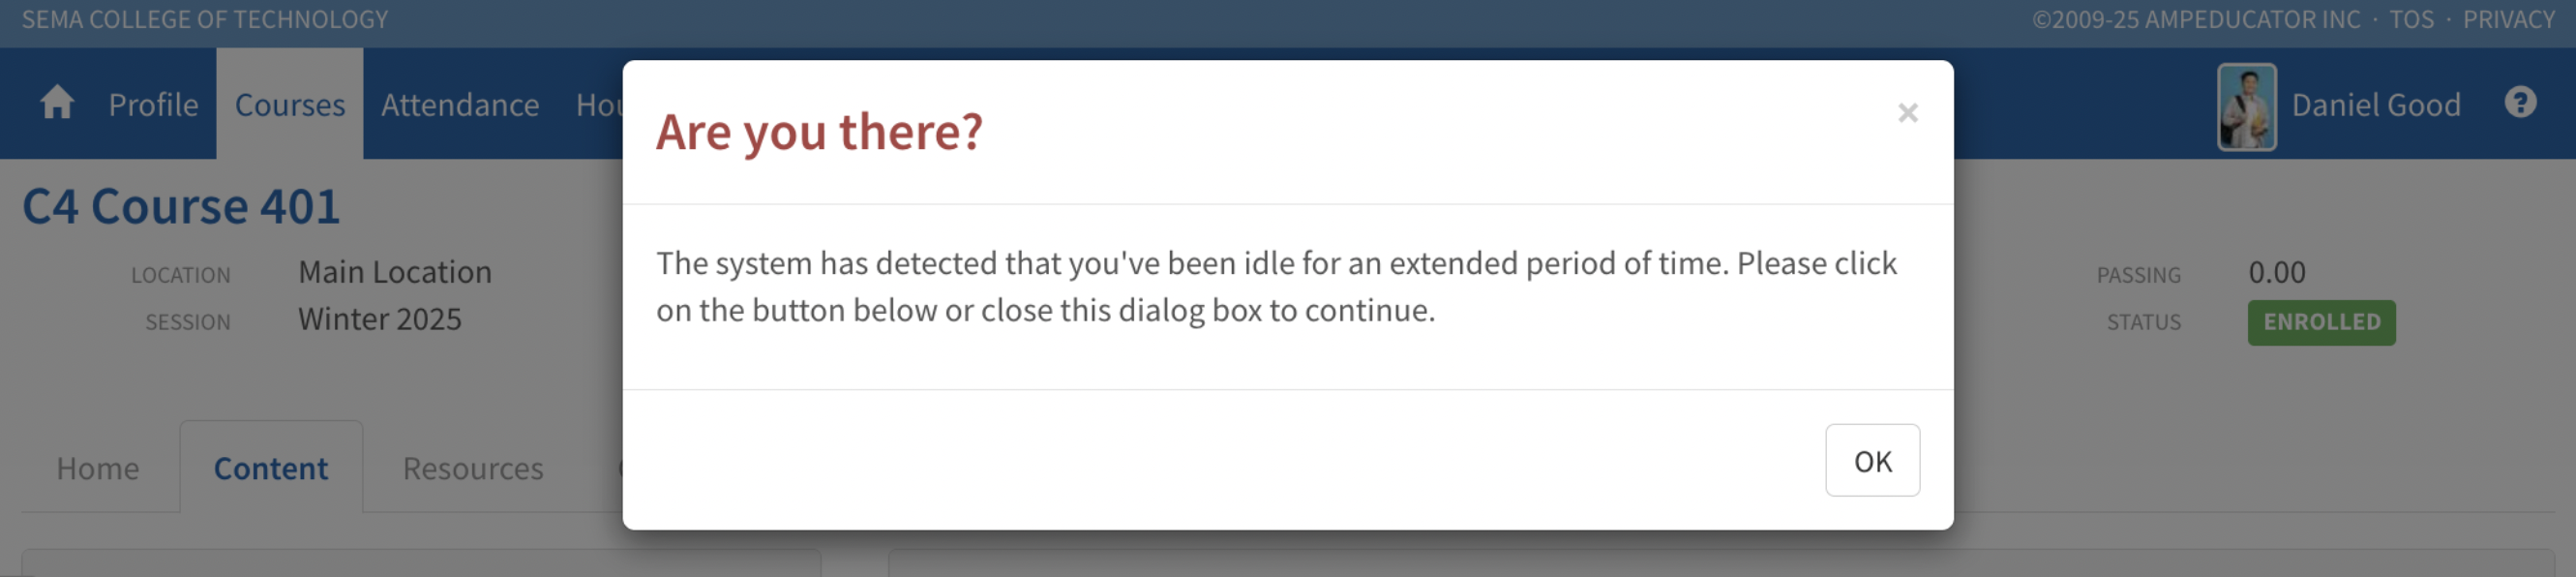
Idle Detection Prompt
If a Student remains inactive past the Engagement Idle limit, a popup appears asking if they’re still there. Clicking OK resumes tracking.
Student Engagement Data
Under Students Tab, you’ll now see a new column called Engage Hrs, showing the total number of hours a Student has spent in the course content.
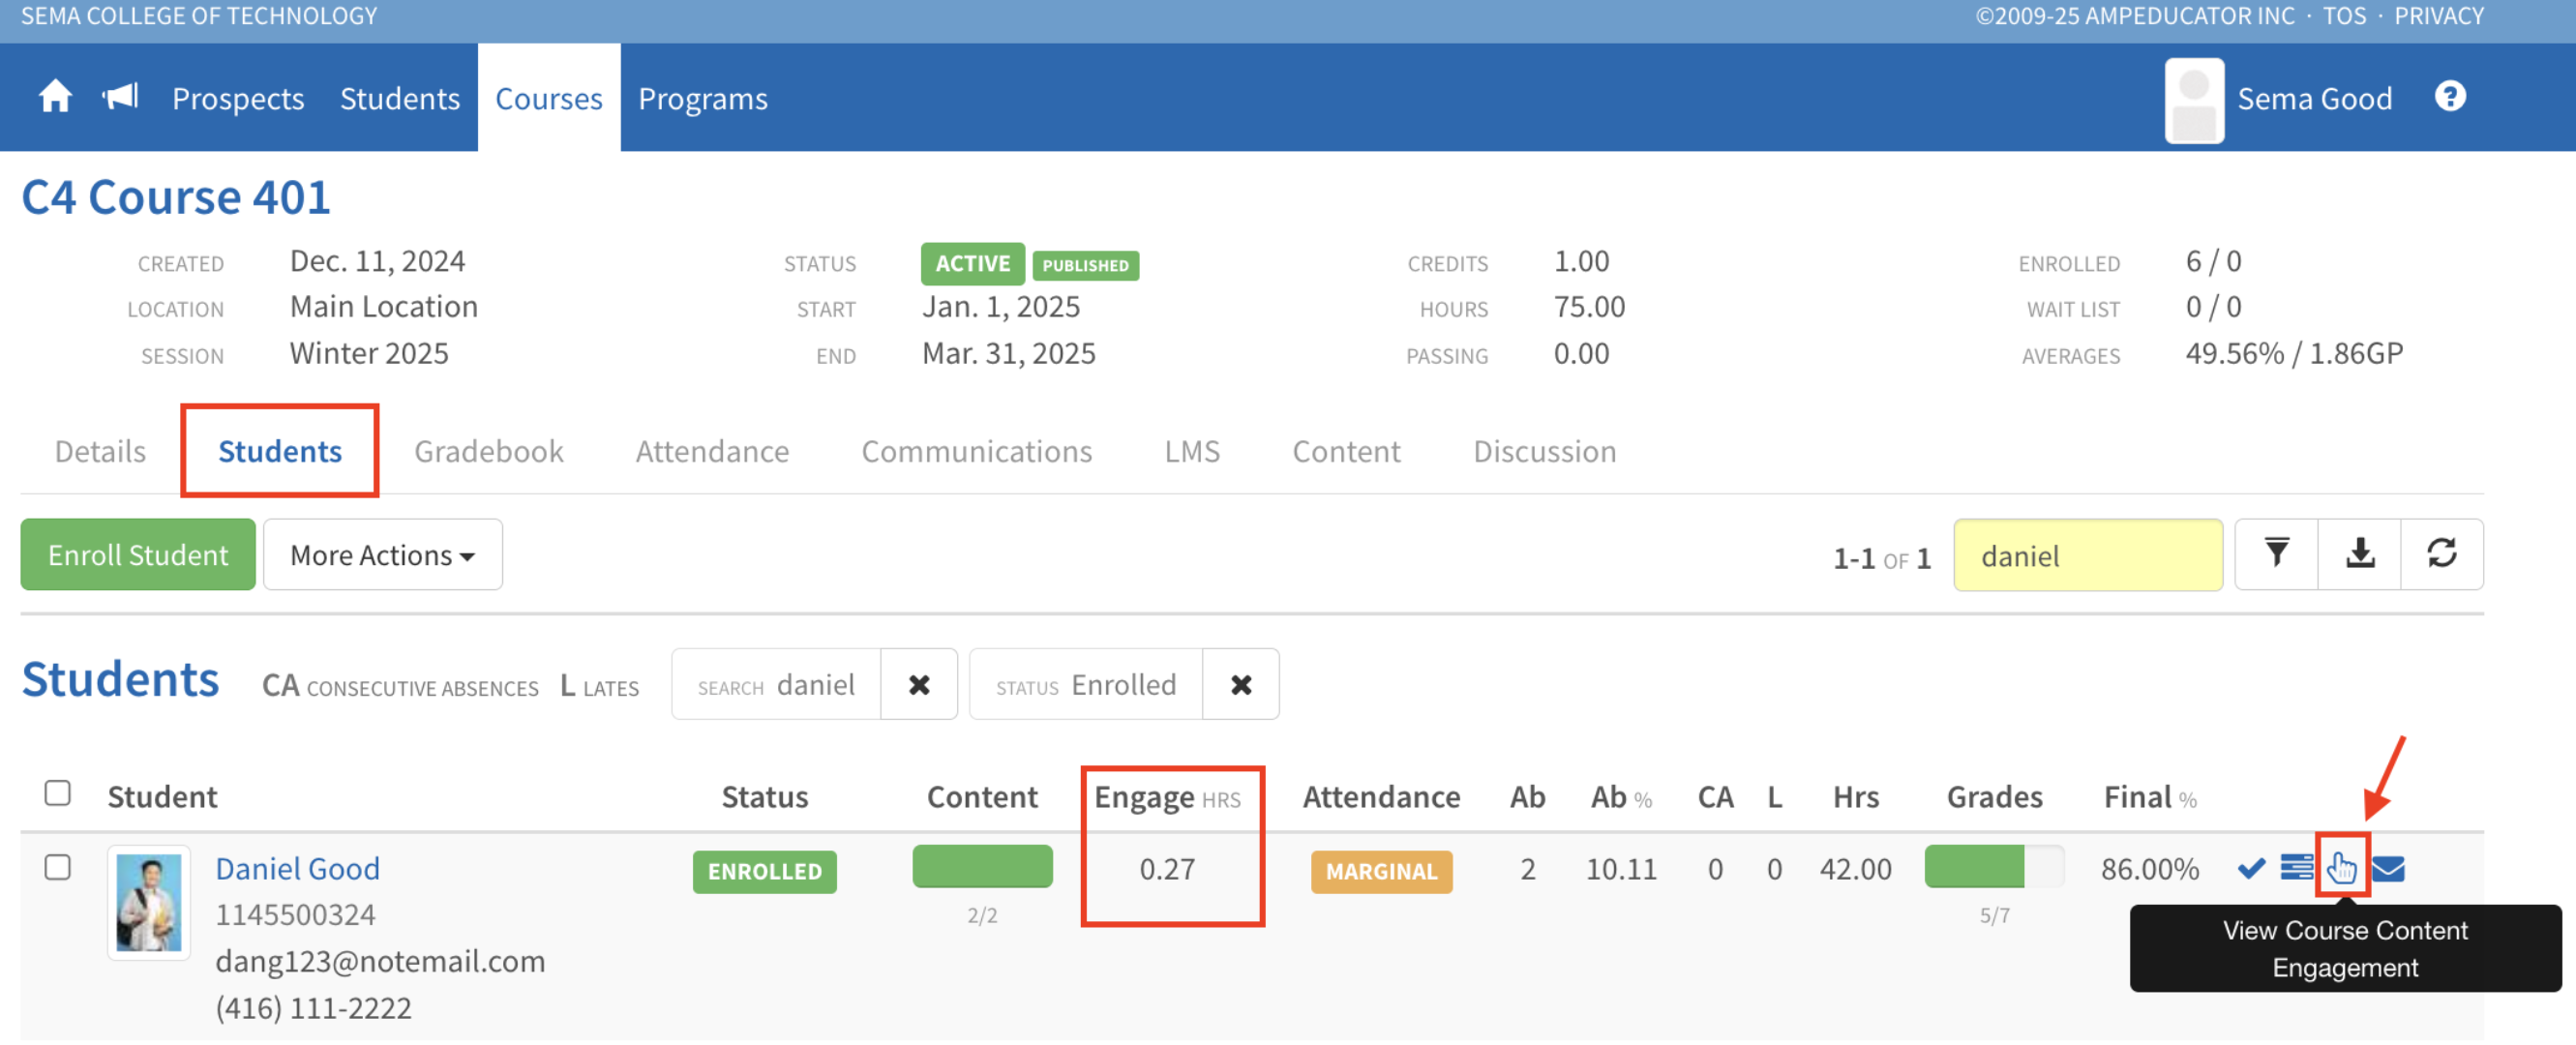
Click the View Course Content Engagement icon to view a detailed breakdown by unit, section, date, and duration.
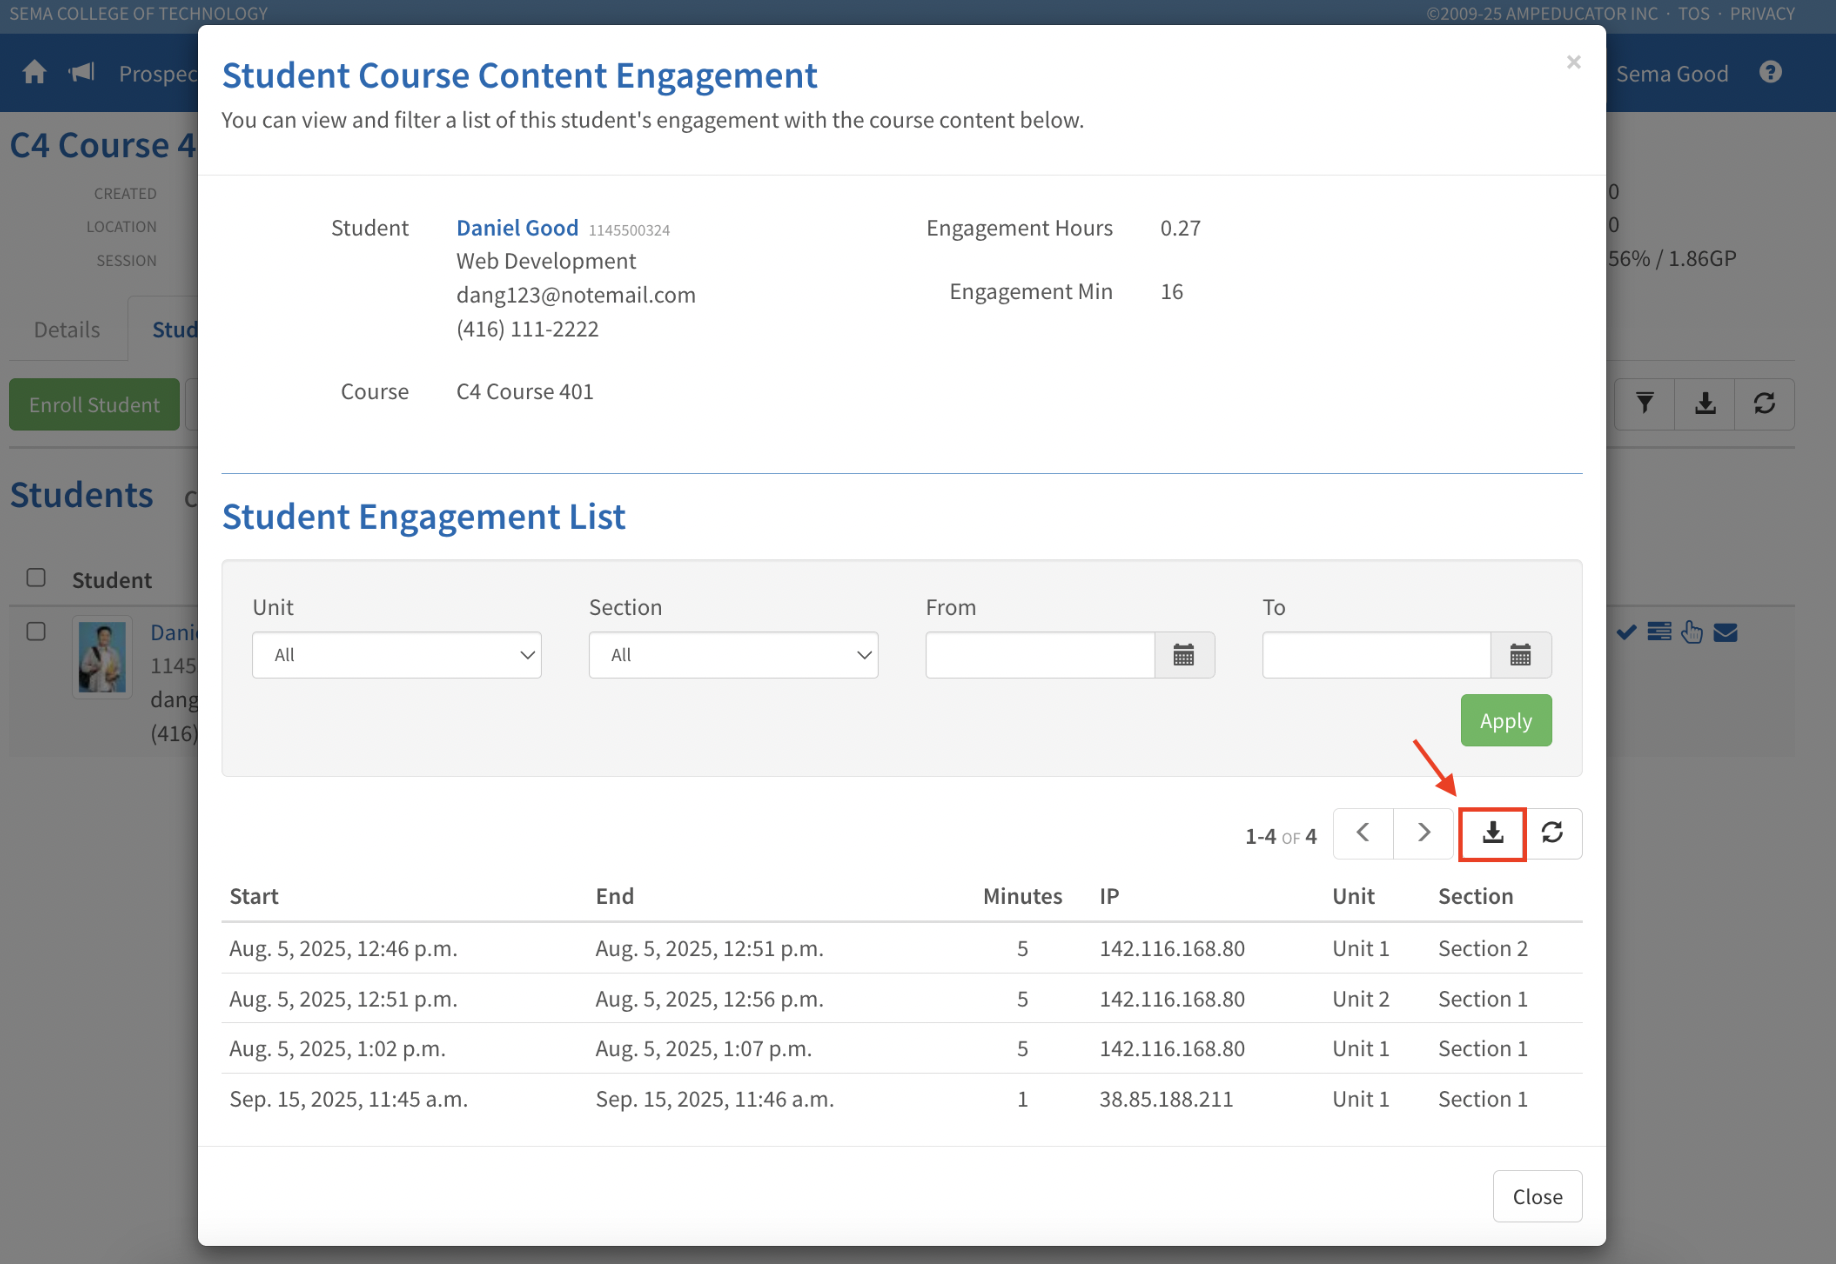
Engagement logs can be exported in PDF, CSV, or XML formats.
Course Template Support
Engagement settings are now included in Course Templates. If configured, they’ll be automatically applied to any new course created from that template.
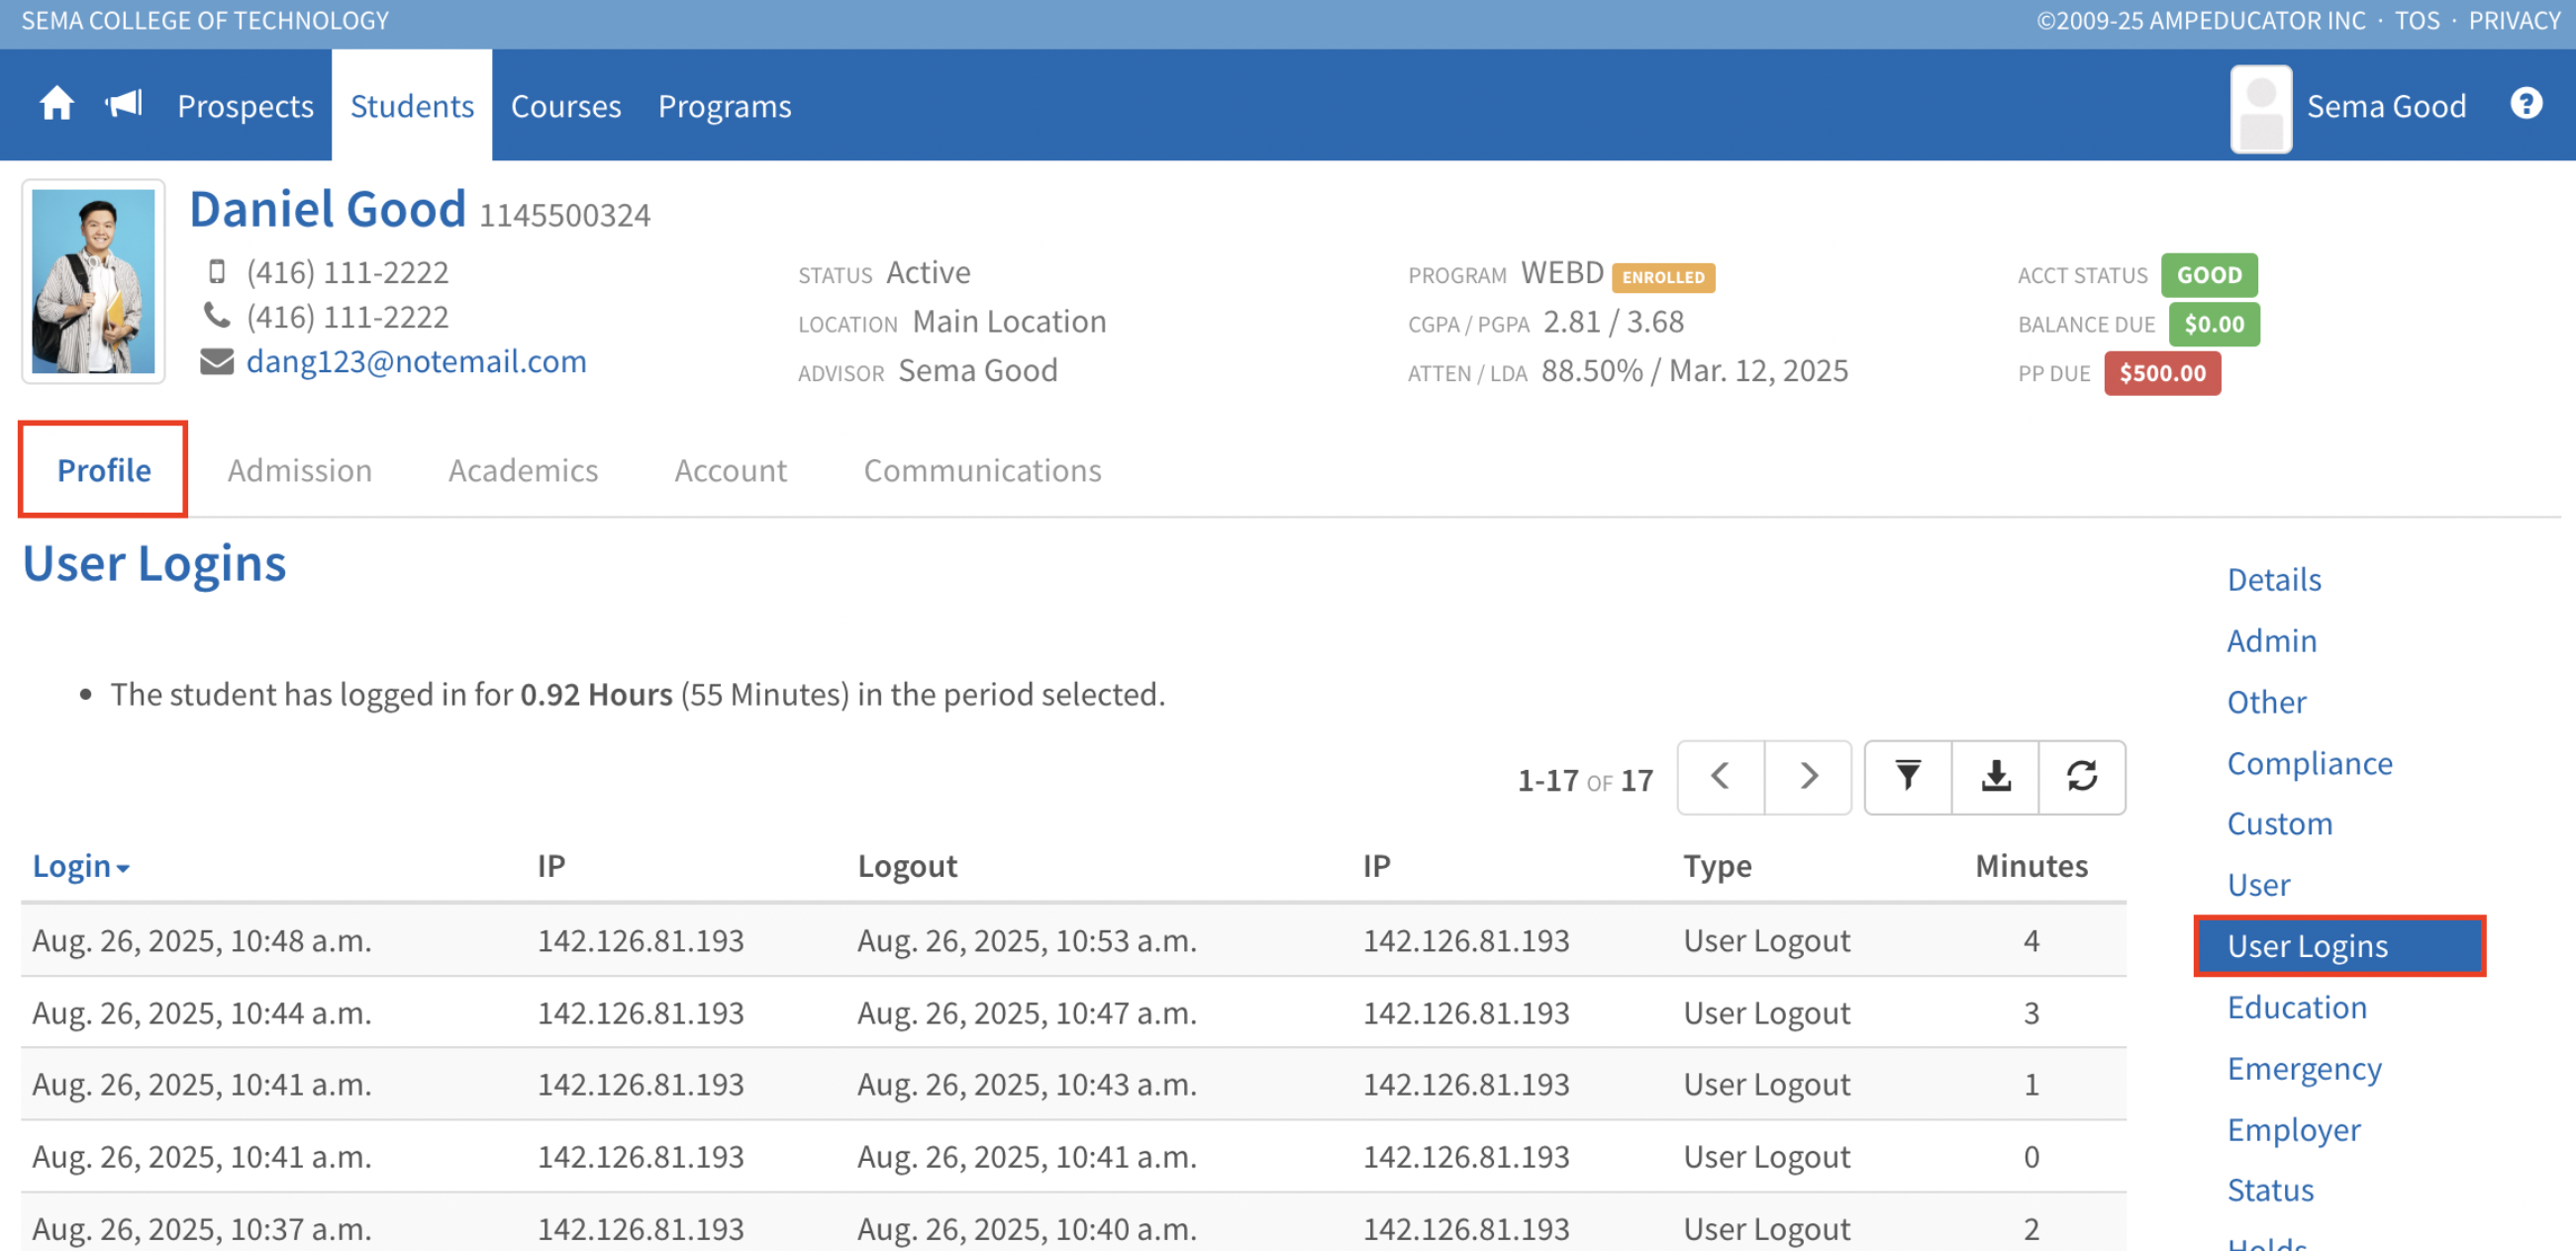
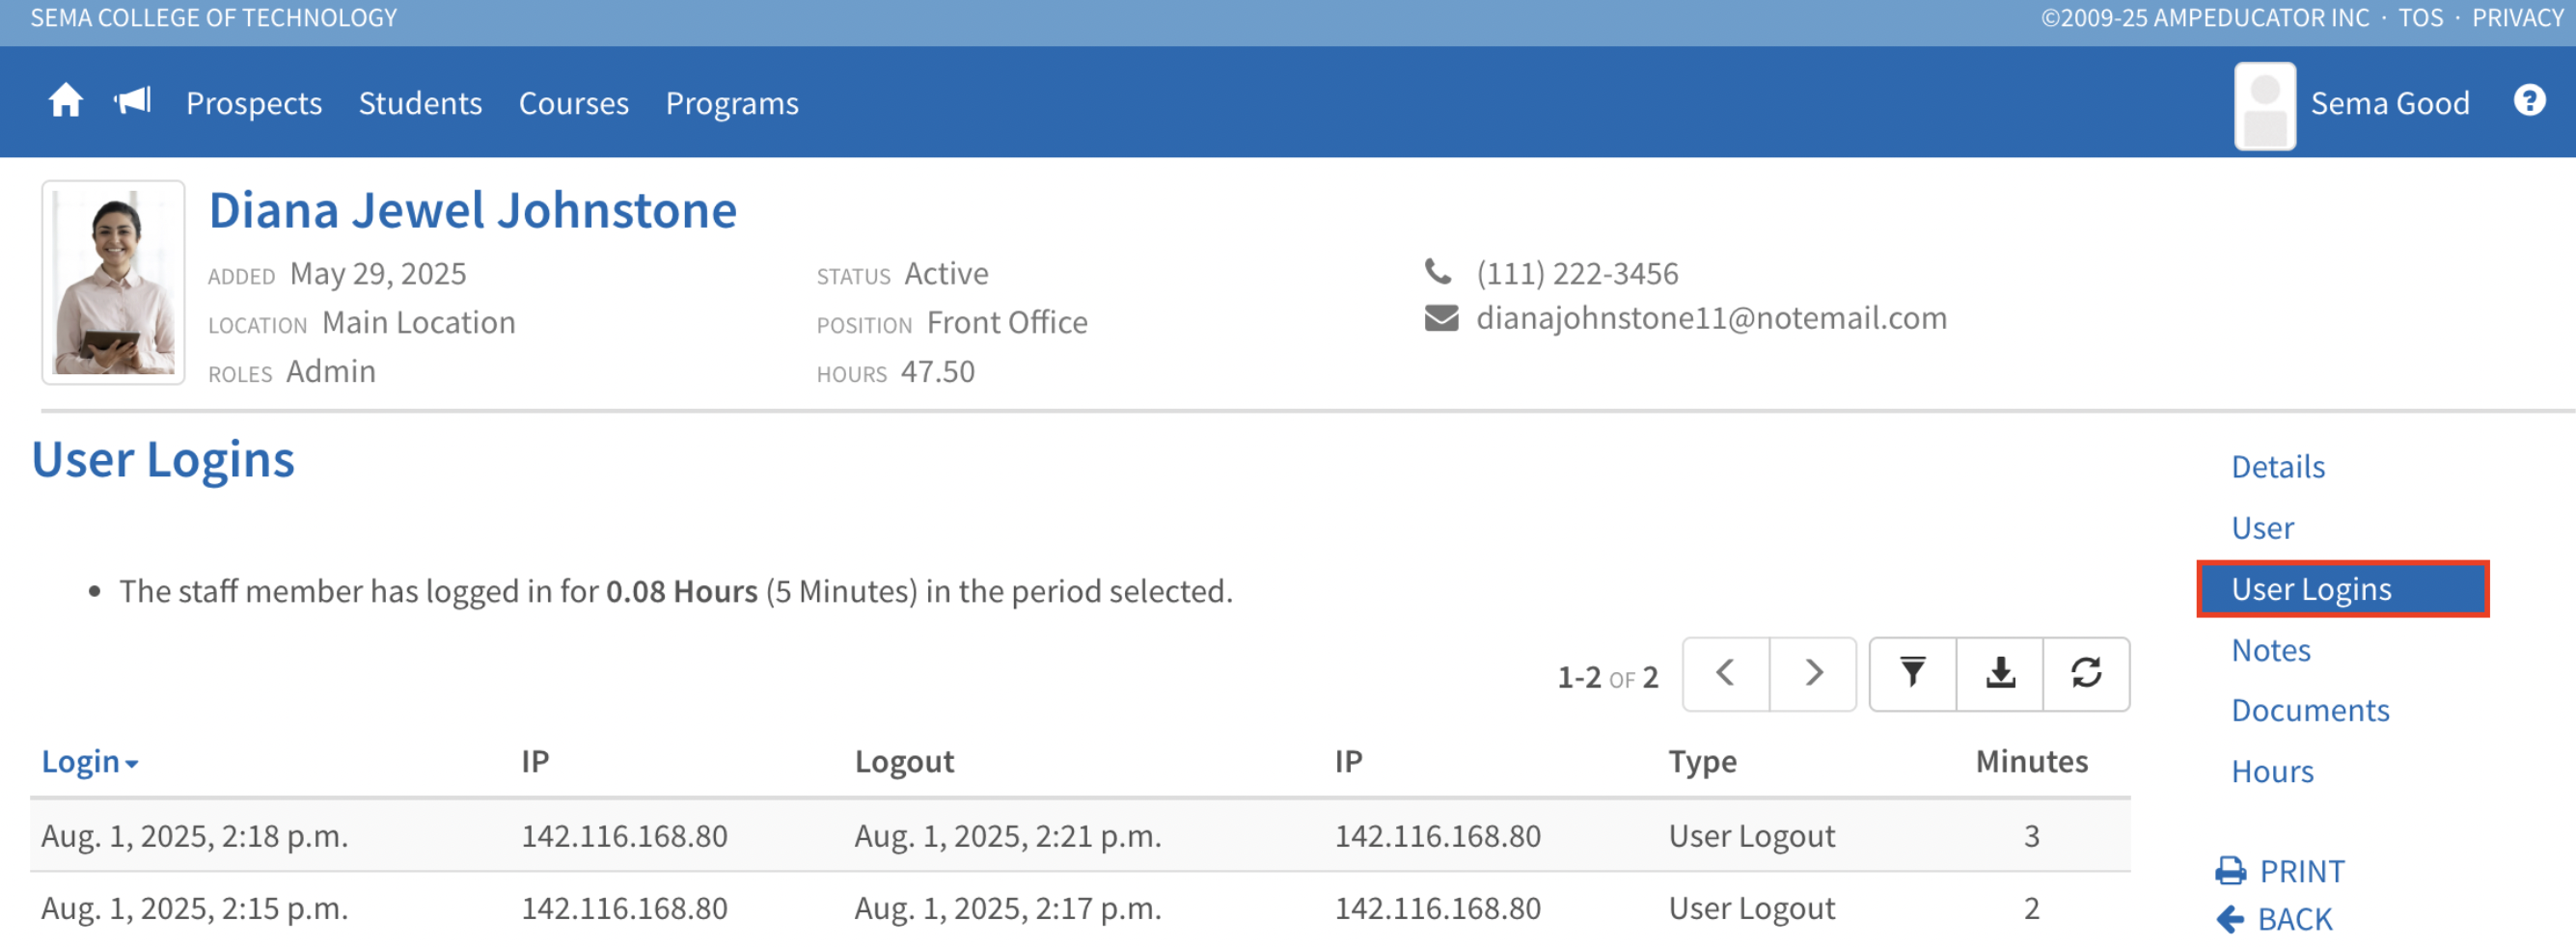
User Logins
Release Date: September 8, 2025
The User Logins feature provides a detailed record of login activity for both Students and Staff. At the top of the page, you’ll see the total amount of time the person has been logged in during the selected date range, shown in hours and minutes.
Each login record includes:
- Login and Logout timestamps
- IP address used
- Type of logout (User Logout or Session Expired)
- Minutes spent during the session
Student Logins
Under Student Profile, you can view a Student’s login history.
Staff Logins
Under Staff Profile, you can view a Staff member’s login history.
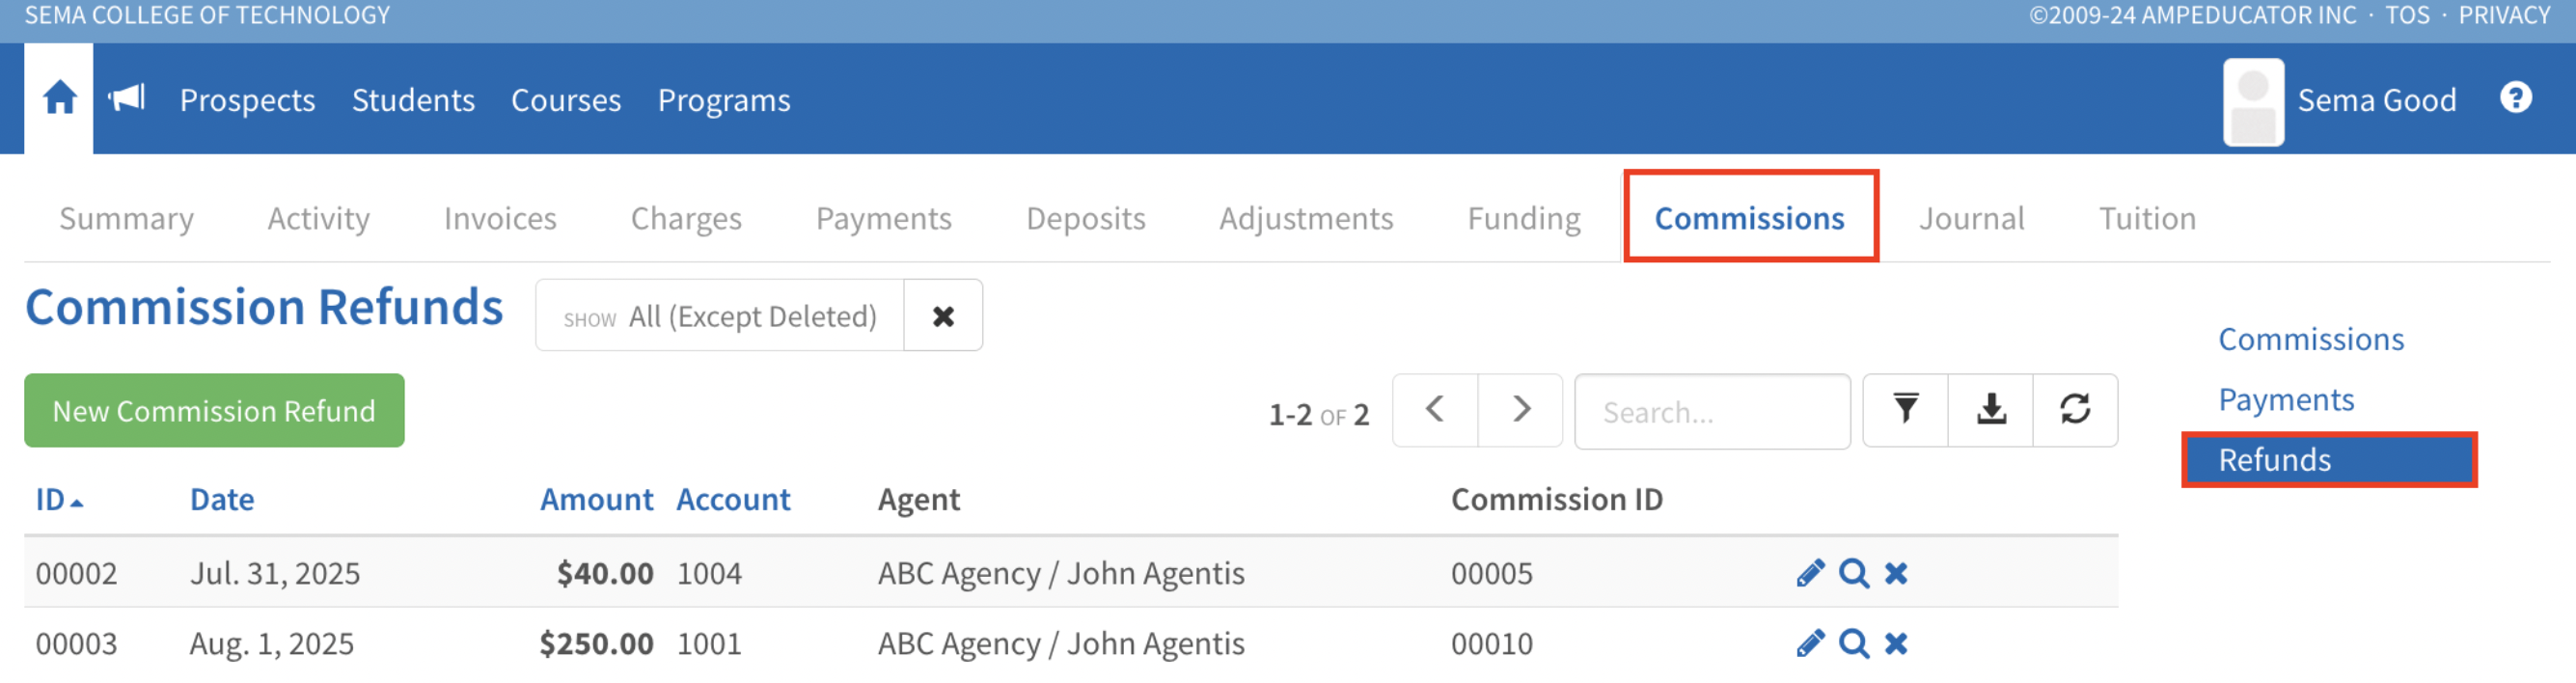
Commission Refunds
Release Date: September 1, 2025
You can now issue and manage Commission Refunds directly in ampEducator, giving you more flexibility and transparency when adjusting agent or agency commissions.
New Commission Refunds Section
A new Refunds section has been added under Home → Accounts → Commissions. This section displays all refunds linked to previously paid commissions, including the date, amount, account, agent, and commission ID.
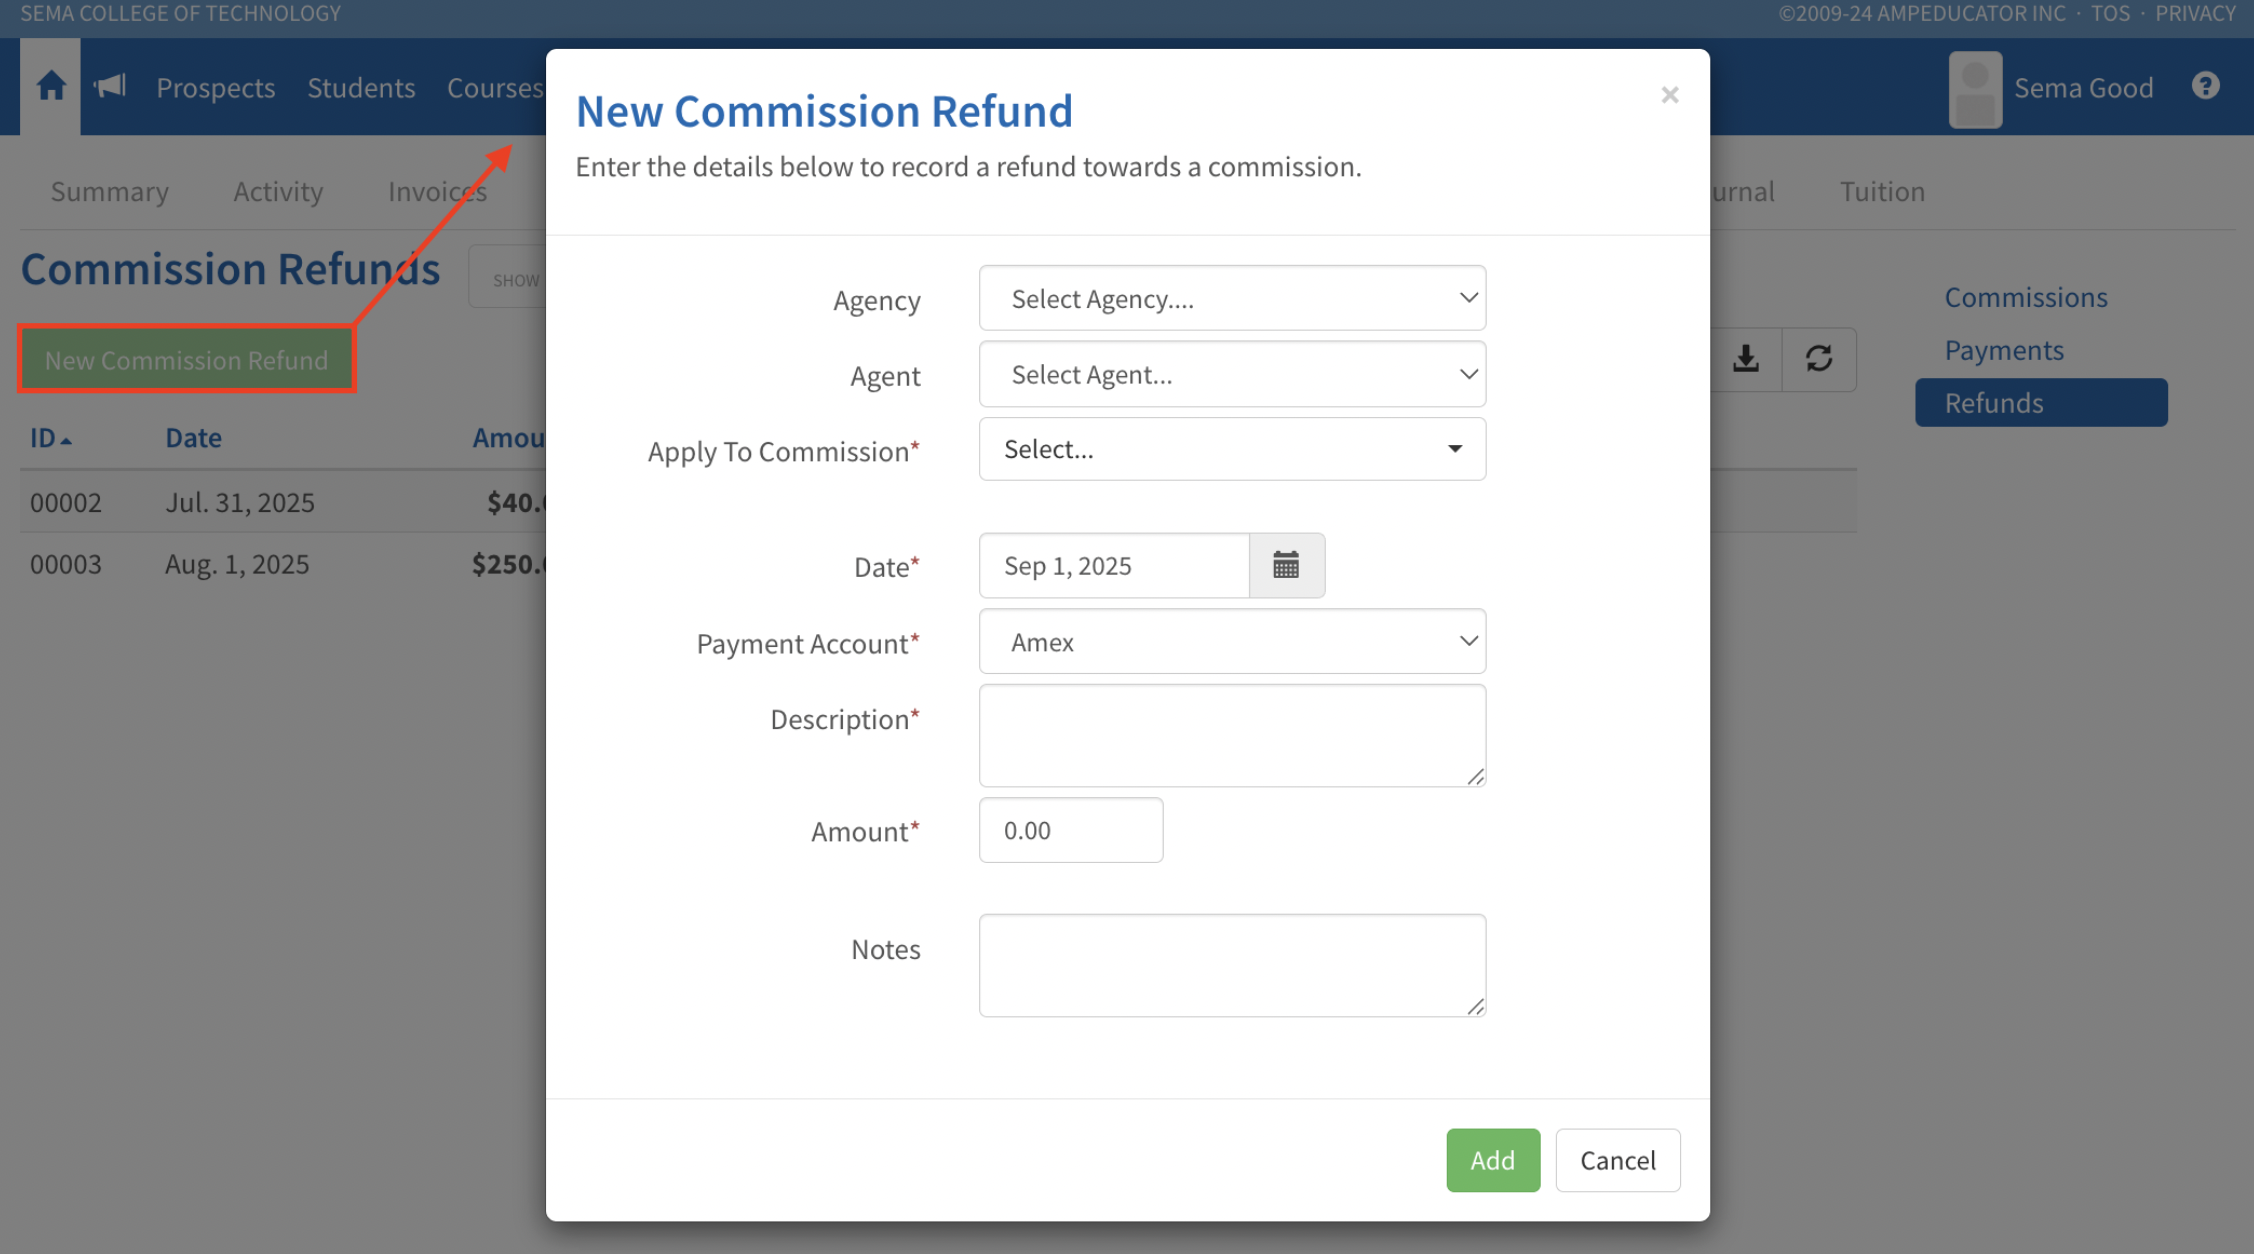
New Commission Refund Modal
Click the green New Commission Refund button to issue a refund. Select the commission, enter the date, payment account, amount, description, and any optional notes. Refunds are tracked with journal entries for accurate reporting.
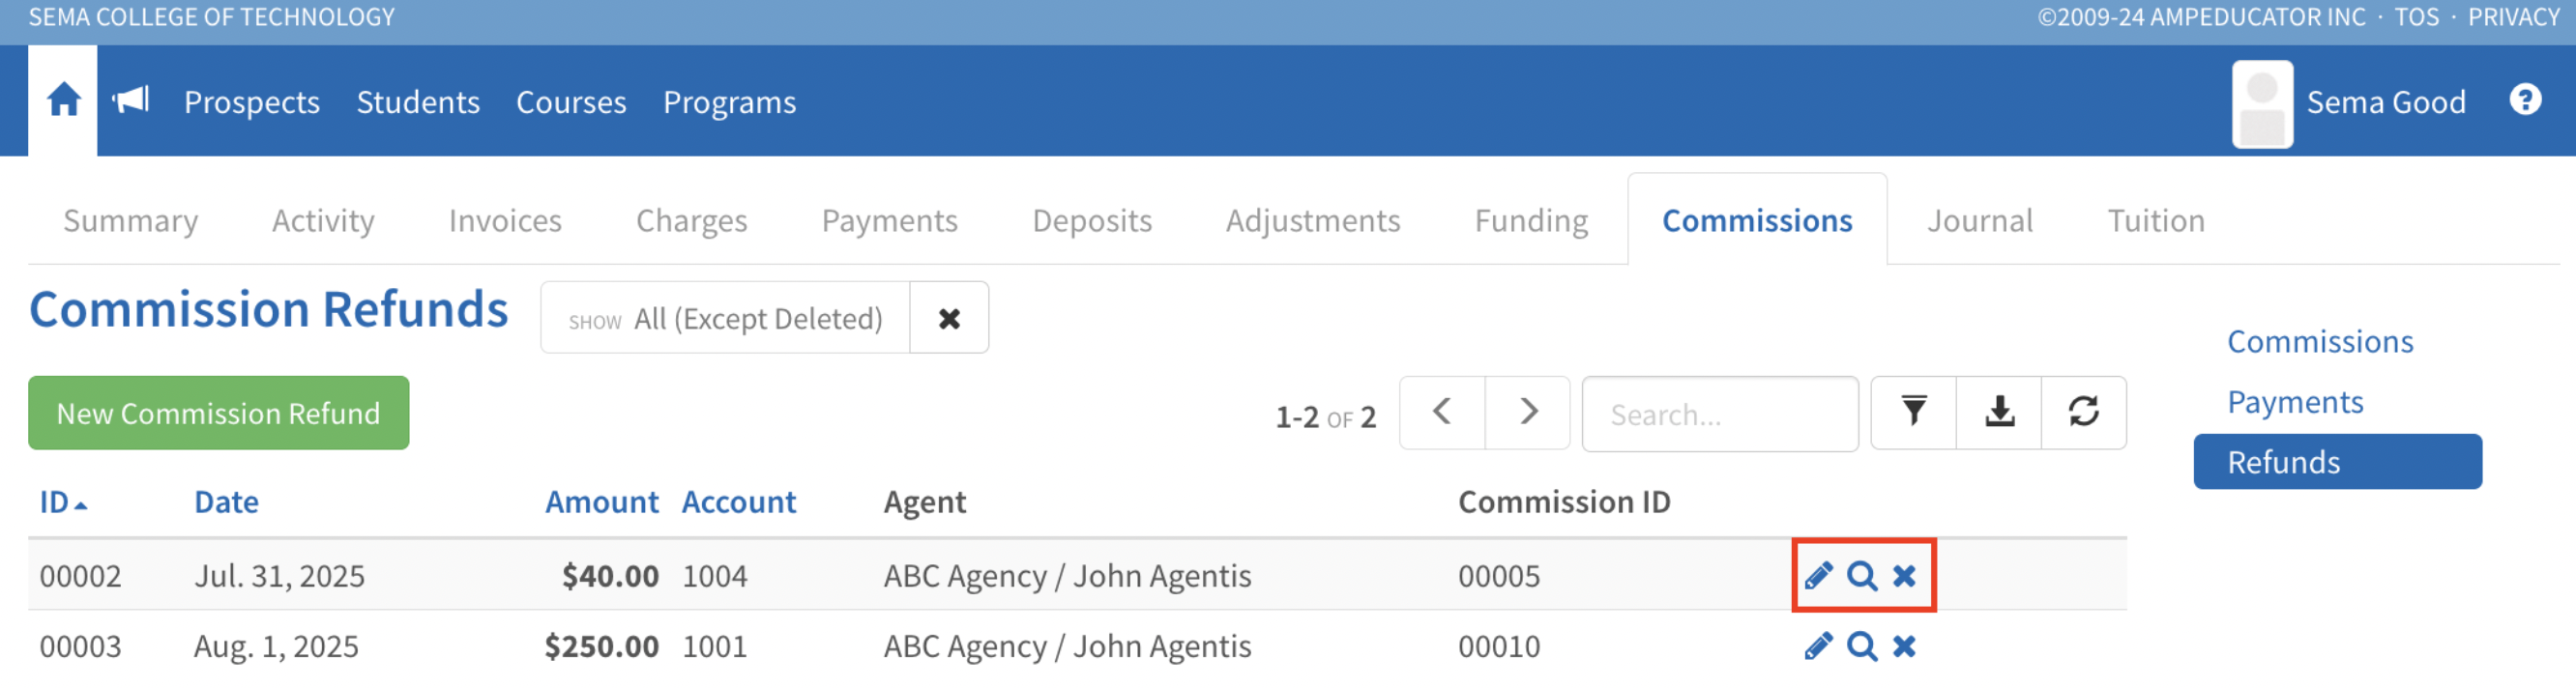
Quick Action Icons
Each refund entry includes icons to:
- Edit the refund and update details
- View a read-only summary with audit trail and journal entries
- Delete the refund (with confirmation)
For more information, visit the user guide section: Commissions, or watch the video below.